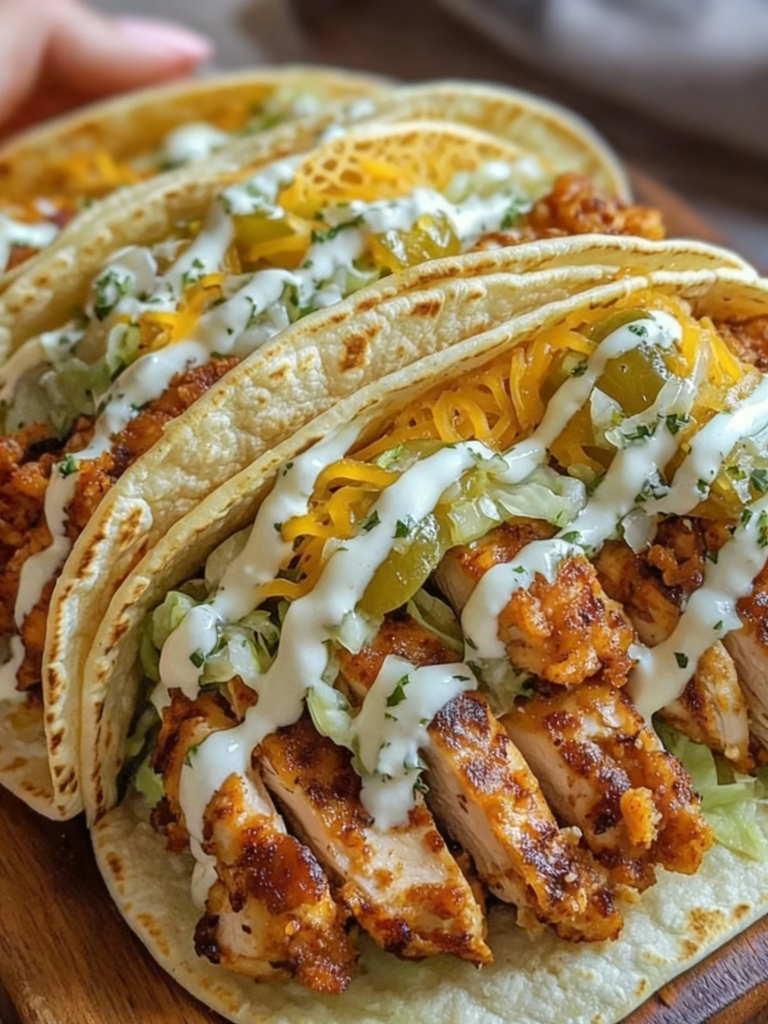
Dill Pickle Ranch Smash Chicken Tacos are a bold, texture-driven take on the smash burger technique applied to ground chicken — seasoned with dill pickle juice, chopped pickles, and ranch dressing, then pressed into thin patties in a hot skillet and surrounded by a ring of shredded cheddar that crisps into a golden, lacy cheese skirt directly in the pan. The combination of pickle brine and ranch dressing does double duty as both marinade and flavor architect, tenderizing the chicken slightly while infusing every patty with the tangy, herbaceous profile that makes this recipe immediately distinct from a standard chicken taco. Wrapped in warm flour tortillas with crisp lettuce, tomato, and jalapeño, each taco delivers a satisfying contrast of juicy, well-seasoned chicken against the shatter of the cheese lace in every bite.
Why You’ll Love This Recipe
- The Cheese Lace Is the Defining Technique – Sprinkling cheddar around the edge of the patty rather than on top of it creates a crispy, frico-style cheese skirt that adds a salty, golden crunch to every taco without any additional equipment or effort beyond the skillet already in use.
- Pickle Juice in the Mix Is a Game Changer – Dill pickle juice is mildly acidic, which lightly tenderizes the ground chicken while seasoning it from within — producing a noticeably more flavorful, moist patty than standard seasoning alone achieves.
- Ready in 35 Minutes with Minimal Prep – Mixing the chicken mixture takes 5 minutes, and each patty cooks in under 7 minutes, making this a fully achievable weeknight dinner with the visual and flavor impact of something that took far longer.
- Eight Individual Patties Mean Easy Serving – One patty per tortilla produces eight self-contained tacos that plate neatly, portion evenly, and require no slicing or dividing at the table — practical for both family dinners and casual entertaining.
- Ranch Dressing Builds Flavor into the Protein, Not Just the Topping – Incorporating the ranch directly into the chicken mixture means the flavor is distributed through the entire patty rather than concentrated only in a drizzle applied after cooking.
- Completely Customizable Toppings and Heat Level – The base patty works with virtually any taco topping, and swapping cheddar for pepper jack or adding sliced jalapeños to the mix shifts the heat level meaningfully without altering the core technique.
Ingredients You’ll Need
Chicken Mixture
- 1 lb ground chicken – the lean, mild protein base that absorbs the pickle and ranch flavors readily; its lower fat content compared to beef makes the pickle juice and ranch dressing essential moisture contributors.
- ¼ cup dill pickle juice – the liquid from any jar of dill pickles; the mild acidity tenderizes the chicken proteins slightly and distributes the briny, tangy dill flavor throughout every patty far more evenly than chopped pickles alone.
- ½ cup ranch dressing – seasons the mixture with its characteristic blend of buttermilk, dill, garlic, and onion while adding fat that keeps the lean ground chicken moist during the high-heat sear.
- ¼ cup finely chopped dill pickles – provides textural pops of tangy, crunchy pickle throughout the patty interior that the juice alone cannot deliver; fine chop ensures they distribute evenly without creating large gaps in the patty structure.
- 1 tsp garlic powder – reinforces the garlic notes already present in the ranch dressing with a deeper, toasted savory quality that develops further during the sear.
- 1 tsp onion powder – adds a mellow, sweet allium depth that rounds out the spice profile and complements both the ranch and pickle flavors.
- ½ tsp smoked paprika – introduces a subtle smokiness and warm color to the patty surface that adds visual depth and a gentle earthiness to the overall flavor.
- Salt and pepper to taste – final seasoning adjustment; the pickle juice, ranch, and cheddar all contribute salt, so season conservatively and taste the raw mixture before adding more.
Cheese Lace
- ½ cup shredded cheddar cheese – sprinkled around the outer edge of each patty in the pan rather than on top; the cheese melts outward into a thin ring, crisps into a golden frico lace, and adheres to the patty edge as it sets — shred from a block for best melt and crispness.
For Assembly
- 8 small flour tortillas – the soft, pliable vessel that wraps around the patty and cheese lace; small tortillas keep the ratio of filling to bread proportional for a taco rather than a burrito-style wrap.
- Optional toppings: shredded lettuce, diced tomatoes, sliced jalapeños – cool, fresh elements that provide textural contrast to the hot, crispy patty and cheese lace; add after the patty is placed to preserve their temperature and texture.
Step-by-Step Instructions
Step 1: Mix the Chicken Mixture — Combine the ground chicken, dill pickle juice, ranch dressing, finely chopped dill pickles, garlic powder, onion powder, smoked paprika, salt, and pepper in a large bowl. Mix thoroughly until all ingredients are fully incorporated and the mixture is uniform — the consistency will be looser and wetter than a standard burger mixture due to the liquid components, which is correct and intentional.
Step 2: Heat the Skillet — Place a non-stick skillet over medium-high heat and allow it to come fully up to temperature before adding any chicken mixture. A properly preheated pan is essential for developing a sear on the patty surface and for the cheese lace to crisp rather than melt and spread without setting.
Step 3: Portion and Smash the Patty — Spoon approximately ¼ cup of the chicken mixture into the hot skillet and immediately press it down firmly with the back of a spatula into a thin, flat patty. The thinner the patty, the greater the surface area in contact with the pan, the more caramelization develops, and the more the cheese lace can spread into a defined, crispy ring around it.
Step 4: Add the Cheese Lace — Immediately sprinkle a tablespoon of shredded cheddar in a ring around the outer edge of the patty — not on top of it. The cheese will melt outward and fuse with the edge of the patty, forming the signature lacy, crispy border as it cooks. Cook for 3 to 4 minutes until the cheese ring has turned golden and the edges are visibly crisped and set.
Step 5: Flip and Finish — Slide a thin spatula fully under both the patty and its attached cheese lace and flip in one confident, decisive motion. The cheese lace will be on the underside at this point and will crisp further against the hot pan surface. Cook for an additional 2 to 3 minutes until the chicken is cooked through and the cheese lace is golden on both sides.
Step 6: Repeat for All Eight Patties — Transfer the finished patty to a plate and repeat the process with the remaining chicken mixture, working in batches as needed. Wipe the skillet between batches if excess cheese residue is darkening on the pan surface, which can cause subsequent lace rings to burn before the chicken is cooked through.
Step 7: Warm the Tortillas — Heat the flour tortillas individually in a dry skillet over medium heat for 20 to 30 seconds per side until warm, soft, and developing light char spots, or microwave them wrapped in a damp paper towel for 30 seconds. Warm tortillas are pliable enough to fold around the patty without cracking.
Step 8: Assemble and Serve — Place one chicken patty with its cheese lace onto each warm tortilla. Add shredded lettuce, diced tomatoes, sliced jalapeños, or any preferred toppings. Serve immediately while the cheese lace retains its crunch — it softens as it cools and the window for peak texture is within a few minutes of coming off the pan.
Recipe Notes & Tips
- Use a Non-Stick Skillet for the Cheese Lace – The cheese lace requires direct contact with the pan surface to crisp properly, and a non-stick surface allows the set cheese ring to release cleanly with the patty when flipped. A stainless or cast iron surface without sufficient oil will cause the lace to stick and tear.
- The Mixture Will Be Wetter Than Expected – The combination of pickle juice and ranch dressing makes this mixture looser than a standard ground meat patty. This is correct — the moisture is what keeps the cooked chicken juicy. Do not add breadcrumbs or fillers to compensate; the smash technique works specifically because the thin patty sets quickly despite the moisture.
- Smash Immediately and Firmly – The window to flatten the patty is in the first 10 to 15 seconds after it hits the pan, before the outer proteins begin to set. Press firmly and quickly with a flat spatula to achieve maximum surface contact and the characteristic thin, crispy-edged smash patty shape.
- Season Conservatively Before Tasting – Dill pickle juice, ranch dressing, and cheddar all contribute significant salt. Taste the raw mixture before adding any additional salt and season in small increments to avoid an over-salted finished patty.
- Wipe the Pan Between Batches – Residual cheese left in the pan from each batch continues to cook and darkens quickly. A brief wipe with a folded paper towel between batches keeps the cooking surface clean and prevents bitter, burnt cheese flavor from transferring to subsequent patties.
- Serve Immediately for Peak Cheese Lace Texture – The crunch of the cheese lace is the signature textural element of this recipe and it diminishes within minutes of leaving the hot pan. Assemble tacos only as they are needed and serve straight from the skillet for the best eating experience.
Nutritional Information
- Prep Time: 15 minutes
- Cook Time: 20 minutes
- Total Time: 35 minutes
- Servings: 4 (2 tacos per serving)
- Calories: 450 per serving
- Fat: 25 g (Saturated 10 g | Unsaturated 12 g) | Carbohydrates: 25 g | Fiber: 2 g | Sugar: 3 g | Protein: 35 g
- Sodium: 850 mg | Cholesterol: 110 mg
Nutritional values are estimates per serving of two tacos without optional toppings. Adding jalapeños, tomatoes, or extra ranch dressing will alter the final figures.
Perfect Pairings
- Extra Ranch Dressing or Chipotle Ranch Dip – A small bowl of ranch alongside reinforces the dressing’s flavor that runs through the chicken and gives each bite a creamy, cool contrast to the crispy cheese lace.
- Lime-Dressed Coleslaw – A crisp, tangy slaw dressed with lime juice and a touch of honey provides cool crunch and acidity that cuts through the richness of the cheese and ranch without competing with the pickle flavor.
- Tortilla Chips and Salsa or Guacamole – A simple chip-and-dip side keeps the meal cohesive with the taco format and adds no additional cooking time or complexity.
- Sparkling Water with Lime or a Cold Light Lager – Both provide clean, refreshing contrast to the bold, tangy, and rich flavors of the tacos; the carbonation in either format resets the palate effectively between bites.
Ideal Occasions
- Weeknight Family Tacos – The 35-minute total time, familiar taco format, and bold but accessible flavors make this a natural weeknight dinner that requires no convincing for picky eaters who already enjoy pickles or ranch.
- Game Day or Casual Entertaining – Eight individual tacos that can be plated on a board with toppings served on the side is a low-effort, high-impact presentation format for groups that encourages everyone to build their own.
- Taco Tuesday Upgrade – A more interesting, technique-driven alternative to standard ground meat tacos that uses a familiar format as its vehicle while delivering a noticeably different and more memorable result.
- Meal Prep Lunches – The chicken patties reheat well and can be prepared in advance, with tortillas and toppings assembled fresh at serving time for work or school lunches that are significantly more satisfying than standard cold options.
Storage & Serving Tips
- Store Patties Separately from Tortillas and Toppings – Refrigerate cooked chicken patties in an airtight container for up to 3 days. Store tortillas and fresh toppings separately so each component can be assembled fresh at serving time rather than pre-assembled tacos that turn soggy during storage.
- Cheese Lace Does Not Store Well – The crispy cheese border softens during refrigeration and does not re-crisp reliably upon reheating. Accept that leftover patties will lose the cheese lace texture and focus reheating efforts on restoring the chicken’s warmth and moisture rather than the crunch.
- Reheating Patties – Reheat in a dry non-stick skillet over medium heat for 2 to 3 minutes per side until warmed through, which is more effective at restoring some surface texture than microwave reheating, which softens the patty and can make the chicken rubbery.
- Freezing Cooked Patties – Individual patties can be frozen between sheets of parchment paper in a freezer-safe bag for up to 2 months. Thaw overnight in the refrigerator and reheat in a skillet before assembling — the texture holds reasonably well, though the cheese lace will not survive the freeze-thaw cycle intact.
Creative Variations to Try
- Pepper Jack Cheese Lace – Swap the cheddar for pepper jack to add a layer of spicy, creamy heat to the crispy cheese border that reinforces the jalapeño topping and pushes the overall heat level of the taco meaningfully higher.
- Buffalo Ranch Version – Replace ¼ cup of the ranch dressing with buffalo sauce and substitute the smoked paprika with a pinch of cayenne for a spicier, tangier patty variation that pairs particularly well with blue cheese crumbles and celery on top.
- Corn Tortilla Variation – Substitute small corn tortillas for flour for a more traditional taco texture and flavor profile; the slightly earthy, firmer corn tortilla contrasts the rich, saucy chicken patty in a different but equally complementary way.
- Spicy Dill Pickle Version – Add ¼ teaspoon of cayenne pepper and 1 teaspoon of red pepper flakes to the chicken mixture and use spicy dill pickle juice in place of standard for a heat-forward variation that amplifies every layer of the dish’s existing spice profile.
Troubleshooting Common Issues
- Patty is falling apart when flipping – The mixture was too wet, the patty was not pressed thin enough, or the first side was flipped before fully setting. Allow the full 3 to 4 minutes on the first side before attempting to flip, and ensure the cheese lace has visibly crisped and bonded to the patty edge before the spatula goes underneath.
- Cheese lace is burning before the patty is cooked through – The heat is too high or the cheese ring was placed too close to the center of the patty rather than at the outer edge. Reduce to medium heat and ensure the cheddar is sprinkled only around the perimeter where it will melt outward into a thin ring rather than pooling against the thicker patty center.
- Chicken mixture is sticking to the spatula when smashing – Lightly spray or oil the bottom of the spatula before pressing. The wet mixture tends to adhere to dry surfaces but releases cleanly from a lightly greased one.
- Finished tacos are soggy immediately – The chicken mixture had too much residual liquid before going into the tortilla, or the tortilla was not warmed and dried sufficiently. Briefly cook the assembled taco in the same dry skillet for 30 seconds after assembly to set the tortilla base before serving.
Why This Recipe Works
The central technique insight of this recipe is borrowed from the smash burger tradition: pressing ground meat thin against a screaming hot surface maximizes the Maillard reaction across the entire patty face, developing far more caramelized, flavorful crust than a thicker, gentler cook produces. Applied to ground chicken — which is leaner and more prone to drying than beef — this technique works precisely because the pickle juice and ranch dressing have been incorporated into the mixture, providing internal moisture that compensates for the fat the sear drives off the surface. The cheese lace technique is a direct application of frico — the Italian method of crisping cheese directly on a hot surface — adapted to form around the patty edge rather than as a separate crisp. By positioning the cheddar in a ring at the patty perimeter, the melting cheese fuses with the chicken edge and crisps simultaneously, becoming structurally attached rather than a separate element that slides off. The acidity of the dill pickle juice serves three functions: it seasons the chicken with brine, it slightly denatures the surface proteins to help the patty hold together during the smash, and it brightens the finished flavor in a way that prevents the richness of the ranch and melted cheese from making the taco feel heavy. At 450 calories per two-taco serving with 35 grams of protein, this is a satisfying, nutritionally substantive meal that delivers its indulgent flavors within a reasonable caloric framework.
Final Thoughts
Dill Pickle Ranch Smash Chicken Tacos with Crispy Cheese Lace succeed because every element of the recipe has a clear technical purpose — the pickle juice tenderizes and seasons, the ranch adds moisture and flavor to a lean protein, the smash technique maximizes caramelization, and the cheese lace provides the crunch that elevates the taco from good to genuinely memorable. It is the kind of recipe that looks and tastes like considerably more effort than 35 minutes reflects, which is its most practical virtue for weeknight cooking. At 450 calories and 35 grams of protein per serving, it is a filling, well-balanced meal that does not require modification to feel complete. For a lighter version, using a light ranch dressing and reducing the cheese quantity slightly trims both calories and sodium without touching the technique or the distinctive pickle-ranch flavor profile that makes this recipe worth making again.