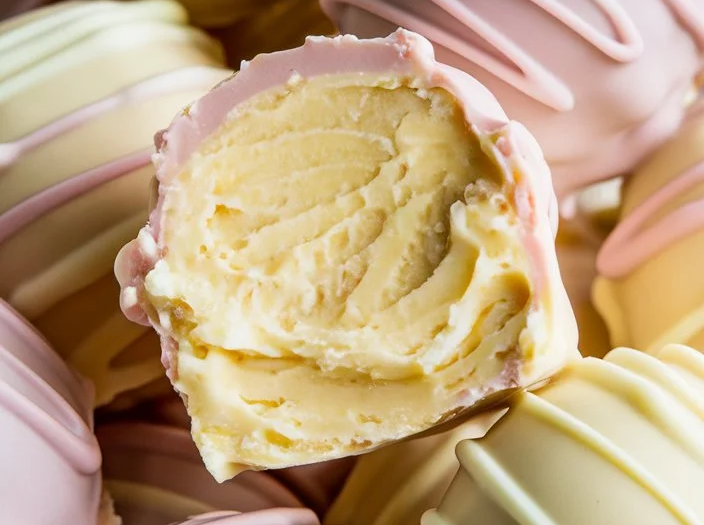
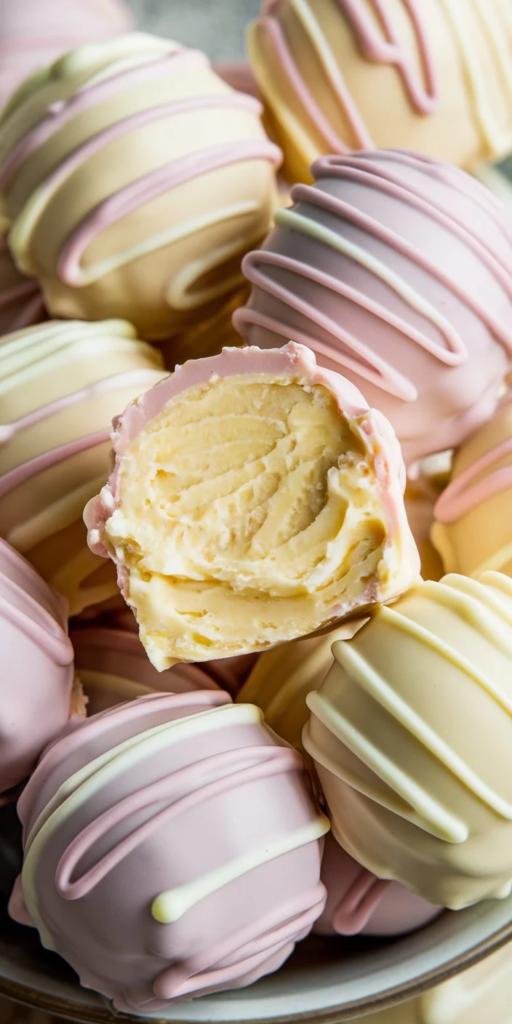
Banana Pudding Easter Truffles are a no-bake, bite-sized dessert that captures the nostalgic flavors of classic banana pudding in a rich, creamy center coated in a smooth white chocolate shell. Crushed vanilla wafers provide structure and a subtle crunch, while cream cheese and banana pudding mix create a soft, dough-like filling that’s easy to shape and intensely flavorful. Finished with pastel-colored chocolate and festive decorations, these truffles are designed to be both visually appealing and simple to prepare, making them an ideal holiday treat that balances convenience with indulgence.
Why You’ll Love This Recipe
- No-Bake Simplicity – The entire recipe comes together without turning on the oven, relying on chilling rather than baking to set the truffles.
- Classic Banana Pudding Flavor – Combines vanilla wafers and banana pudding mix for a nostalgic, dessert-inspired taste in every bite.
- Perfect for Easter Presentation – Pastel-colored coatings and decorative toppings make these truffles visually ideal for spring celebrations.
- Soft, Creamy Center with Crisp Shell – The contrast between the smooth filling and firm chocolate coating creates a satisfying texture.
- Make-Ahead Friendly – The truffles can be prepared in advance and stored until ready to serve or gift.
- Customizable Decorations – Easily adapt colors, toppings, and drizzle styles to match different holidays or themes.
Ingredients You’ll Need
For the Filling
- 2 cups crushed vanilla wafers – forms the base of the truffle mixture, adding structure and a lightly sweet, crumbly texture that mimics traditional banana pudding layers.
- 1/2 cup cream cheese, softened – binds the mixture together while adding richness and a smooth, creamy consistency.
- 1 package (3.4 oz) banana pudding mix (dry) – delivers concentrated banana flavor and helps firm up the filling without additional cooking.
- 2 tablespoons milk – hydrates the pudding mix and helps create a cohesive dough-like texture.
- 1 teaspoon vanilla extract – enhances the overall flavor and complements both the banana and wafer notes.
For the Coating
- 2 cups white chocolate chips or candy melts – creates the outer shell that firms up around the truffles, providing sweetness and structure.
- Food coloring (pastel colors) – used to tint the coating for a festive Easter appearance.
For Decoration (Optional)
- Crushed vanilla wafers – adds texture and reinforces the banana pudding theme.
- Easter sprinkles – provides color and seasonal visual appeal.
- Colored chocolate drizzle – adds contrast and a decorative finish.
Step-by-Step Instructions
Step 1: Make the Filling — In a mixing bowl, combine the crushed vanilla wafers, softened cream cheese, dry banana pudding mix, milk, and vanilla extract. Mix thoroughly until a soft, cohesive dough forms with no dry pockets.
Step 2: Shape the Truffles — Scoop and roll the mixture into 1-inch balls using your hands or a small cookie scoop. Place them on a parchment-lined baking sheet, spacing them slightly apart.
Step 3: Chill Until Firm — Transfer the tray to the refrigerator and chill for 30 to 45 minutes, or until the truffle centers are firm enough to hold their shape during dipping.
Step 4: Melt the Chocolate — Place the white chocolate chips or candy melts in a microwave-safe bowl. Heat in 30-second intervals, stirring between each, until fully melted and smooth. Add food coloring if desired and mix until evenly tinted.
Step 5: Coat the Truffles — Using a fork or dipping tool, submerge each chilled truffle into the melted chocolate. Lift it out, allowing excess coating to drip off before placing it back onto the parchment-lined tray.
Step 6: Decorate Immediately — While the coating is still wet, sprinkle crushed wafers, Easter sprinkles, or drizzle with colored chocolate for a decorative finish.
Step 7: Set and Serve — Allow the truffles to set at room temperature or in the refrigerator for 15 to 20 minutes until the coating is firm. Serve in a decorative bowl or package for gifting.
Recipe Notes & Tips
- Soften Cream Cheese Fully – Cold cream cheese will not mix smoothly and can create lumps in the filling.
- Chill Before Dipping – Proper chilling is essential to prevent the truffles from falling apart in the melted chocolate.
- Work in Batches – Keep some truffles in the refrigerator while coating others to maintain firmness.
- Use Candy Melts for Stability – Candy melts are easier to work with than white chocolate and set more reliably.
- Decorate Quickly – Toppings must be added before the coating hardens for proper adhesion.
- Avoid Overheating Chocolate – Excess heat can cause the chocolate to seize; always melt gradually.
Nutritional Information
- Prep Time: 20 minutes
- Chill Time: 30 to 45 minutes
- Set Time: 15 to 20 minutes
- Total Time: Approximately 1 hour 15 minutes
- Servings: About 20 to 24 truffles
- Calories: Approximately 120 to 150 per truffle
- Primary Macros: Moderate fat from chocolate and cream cheese; moderate carbohydrates from wafers and coating; low protein
Nutritional values are estimates and vary based on coating type and decorations used.
Perfect Pairings
- Cold Milk or Vanilla Milkshake – Complements the creamy banana flavor and balances sweetness.
- Coffee or Espresso – Provides a slightly bitter contrast to the rich white chocolate coating.
- Fresh Fruit Platter – Strawberries or pineapple add freshness and acidity alongside the truffles.
Ideal Occasions
- Easter Celebrations – Their pastel appearance and bite-sized format make them perfect for holiday dessert tables.
- Gift Giving – Easily packaged into boxes or bags for homemade edible gifts.
- Spring Gatherings – Bright, sweet treats that fit seasonal themes and light entertaining.
- Family Dessert Projects – Simple steps make them fun to prepare with kids.
Storage & Serving Tips
- Refrigerator Storage – Store in an airtight container in the refrigerator for up to 5 days.
- Serving Temperature – Let sit at room temperature for 5 to 10 minutes before serving for the best texture.
- Freezing Option – Freeze for up to 1 month; thaw in the refrigerator before serving.
- Avoid Warm Environments – The chocolate coating can soften if left out too long.
Creative Variations to Try
- Milk Chocolate Coating – Swap white chocolate for milk or dark chocolate for a richer flavor contrast.
- Banana Extract Boost – Add a few drops of banana extract for a more intense banana flavor.
- Coconut Easter Truffles – Roll coated truffles in shredded coconut for added texture.
- Mini Egg Surprise Center – Press a small candy egg into the center of each truffle before shaping.
Troubleshooting Common Issues
- Filling too soft to shape – Add more crushed wafers or chill longer before rolling.
- Chocolate coating too thick – Stir in a small amount of coconut oil to thin the consistency.
- Truffles falling apart when dipping – Not chilled enough; return to refrigerator before coating.
- Uneven coating – Ensure chocolate is fully melted and smooth before dipping.
Why This Recipe Works
This recipe works by combining dry pudding mix and crushed wafers with cream cheese to create a stable, moldable filling that holds its shape after chilling. The wafers absorb moisture from the cream cheese and milk, forming a cohesive structure, while the pudding mix delivers concentrated flavor without requiring cooking. The chocolate coating acts as a protective shell, sealing in the soft interior and providing a contrasting texture. Chilling the centers before dipping ensures clean coating and consistent results, while the quick-setting outer layer locks everything in place.
Final Thoughts
Banana Pudding Easter Truffles offer a playful, festive twist on a beloved dessert, transforming familiar flavors into an easy, elegant treat. Their no-bake simplicity, customizable appearance, and crowd-pleasing taste make them a reliable choice for holiday gatherings or homemade gifts. Whether decorated in soft pastels or kept classic and simple, they deliver a balance of creamy, crunchy, and sweet in every bite.