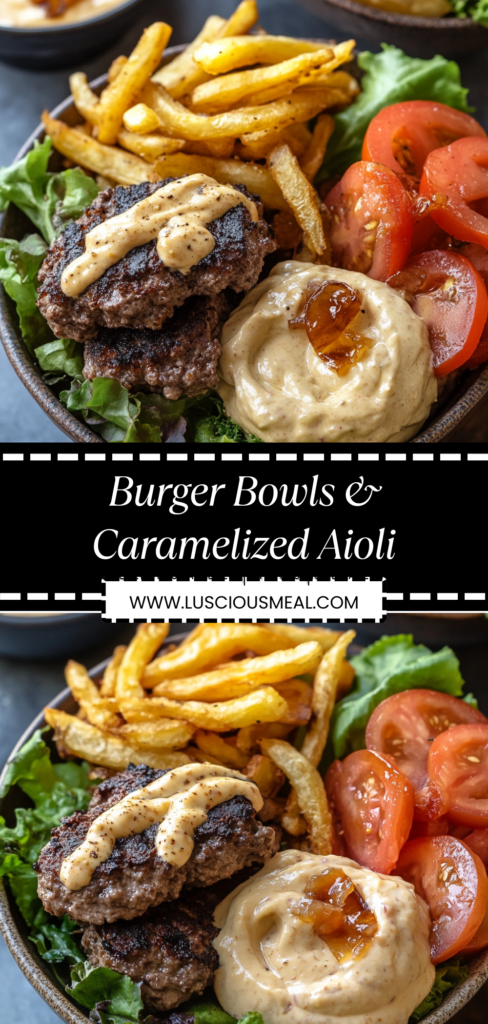
These burger bowls deliver all the satisfying flavors of your favorite cheeseburger without the bun, making them perfect for low-carb eaters or anyone who loves a hearty, customizable meal. Each component – from the seasoned ground beef to the rich, sweet caramelized onion aioli – works together to create a complete experience that’s somehow better than the sum of its parts. If you enjoy these deconstructed burger bowls, you might also like taco bowls, Greek meatball bowls, or steak and vegetable power bowls.
Why You’ll Love This Recipe
- Weeknight-friendly – the components come together in about 30 minutes, with the onions being the only time-intensive element (which can be made ahead)
- Customizable for different diets – naturally gluten-free, keto-friendly, and easily adaptable for paleo or dairy-free needs without sacrificing flavor
- Family-pleasing format – set up a “bowl bar” where everyone builds their own creation with their preferred toppings and proportions
- Meal-prep champion – all components store well for 3-4 days, making this perfect for planning multiple meals at once
Ingredients Breakdown
Ground beef: The standard 80/20 lean-to-fat ratio provides the best flavor and juiciness for burger bowls. While you could use leaner meat, the extra fat contributes significantly to the burger experience. Higher-fat ground beef develops those crispy, flavorful edges when cooked properly and stays tender rather than becoming dry and crumbly. If you prefer, ground turkey or chicken can substitute, but consider adding a tablespoon of olive oil to the pan first to compensate for the lower fat content and prevent sticking.
Caramelized onions: These are transformative and worth every minute they take to prepare. The slow cooking process converts the onions’ sharp, pungent flavors into deep, complex sweetness that adds incredible dimension to the aioli. Yellow onions work perfectly here, but sweet onions like Vidalias intensify the caramelized sugar notes even more. Don’t rush this process – proper caramelization takes 25-30 minutes of patient, occasional stirring. For a shortcut version, you can add a teaspoon of brown sugar and a splash of balsamic vinegar to speed up the caramelization process, though the depth of flavor won’t be quite the same as the slow-cooked version.
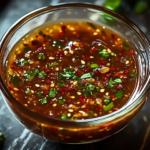
Mayonnaise base for aioli: Real mayonnaise creates the richest aioli, but light mayonnaise or even Greek yogurt can substitute if you’re watching calories. The crucial element is having enough fat to carry the flavors of the caramelized onions throughout the sauce. The creamy texture also provides the perfect counterpoint to the savory beef and fresh vegetables, binding all the elements together like the sauce on a traditional burger. For a more authentic aioli, you can add a clove of grated garlic along with the onions.
Vegetable components: The beauty of these bowls is their versatility. Crisp romaine provides the perfect foundation with its refreshing crunch, while tomatoes add juicy sweetness. Pickles deliver that crucial tangy note that cuts through the richness of the meat and aioli. For extra nutrition without changing the burger experience, try adding roasted vegetables like zucchini or bell peppers, which provide sweetness and complexity while maintaining the bowl’s flavor profile.
Step-by-Step Instructions
- Begin by preparing the caramelized onions, as they’ll take the longest. Slice two large yellow onions into thin half-moons and heat 2 tablespoons of butter or oil in a large skillet over medium heat until shimmering. The wide surface area allows the moisture to evaporate more efficiently, helping the onions caramelize rather than steam. Make sure your pan is properly heated before adding the onions – you should hear a gentle sizzle when they hit the surface.
- Add the sliced onions to the pan along with a pinch of salt, which helps draw out moisture. Stir to coat with fat, then reduce heat to medium-low. Cook for 25-30 minutes, stirring occasionally to prevent burning while allowing enough time between stirs for proper caramelization. Be patient here – this transformation can’t be rushed. You’ll notice the onions gradually shifting from white to translucent, then golden, and finally to a rich amber brown color. They’ll also reduce dramatically in volume as they cook down.
- While the onions are caramelizing, prepare the burger seasoning by combining 1 teaspoon salt, 1/2 teaspoon black pepper, 1 teaspoon garlic powder, and 1/2 teaspoon onion powder in a small bowl. This blend recreates the classic burger flavor profile without the need for packaged mixes that might contain fillers or preservatives. The garlic and onion powders are particularly important as they add depth without the textural distraction of fresh aromatics.
- Heat a separate large skillet over medium-high heat until very hot. Add the ground beef and sprinkle with the seasoning mixture. Let the meat cook undisturbed for about 2 minutes to develop a good crust on the bottom. This initial searing is crucial for developing flavor through the Maillard reaction – the same browning that makes a grilled burger so delicious. Resist the urge to stir immediately; patience here pays off with better flavor.
- Break the meat into chunks with a wooden spoon and continue cooking until no pink remains, about 5-7 minutes total. Unlike with loose taco meat, you want to leave the beef in larger pieces reminiscent of a crumbled burger patty rather than tiny granules. These bigger pieces provide better texture and juiciness in the final bowl. If there’s excessive fat in the pan, you can drain it off, but leaving some adds flavor to the meat.
- Once the onions have caramelized to a deep brown color and incredibly soft texture, remove them from heat and allow to cool slightly. They should be jammy and intensely flavorful, with no raw onion taste remaining. The cooling period prevents the mayonnaise from breaking when you combine the ingredients for the aioli.
- Make the caramelized onion aioli by combining 3/4 cup mayonnaise with 1/4 cup of the cooled caramelized onions in a food processor or blender. Pulse until well combined but still maintaining some texture. Add a squeeze of fresh lemon juice and a pinch of salt, then blend once more. The acidity from the lemon brightens the rich onion flavor and balances the creamy mayonnaise, while keeping some texture in the onions provides visual interest and concentrated pockets of flavor.
- Prepare your bowl components by washing and chopping romaine lettuce, slicing tomatoes, preparing pickles, and any other desired toppings. Creating a good balance of textures is key to a satisfying bowl – you want crunchy, fresh elements to contrast with the warm, savory meat and rich aioli. Pre-shredded cheese saves time, but freshly grated cheese melts better if you’re planning to add it while the meat is still hot.
- To assemble each bowl, start with a base of romaine lettuce, then add a generous portion of the seasoned beef. Arrange your toppings around the beef, and finish with a substantial drizzle of the caramelized onion aioli. For the most visually appealing and practical bowl, keep the components somewhat separated rather than mixing everything together. This allows the eater to appreciate each element individually or combine them as desired.
Perfect Texture: What to Look For
The most successful burger bowls have a thoughtful balance of textures. The beef should be tender but with some crispy edges from proper browning. The lettuce provides essential crunch, while the aioli delivers creamy richness that ties everything together. When assembled correctly, each bite should offer multiple texture experiences – similar to biting into a well-constructed burger. If your beef turns out too crumbly, try using a gentler touch when breaking it up during cooking, and consider a slightly higher fat content meat next time.
Customization Options
These bowls can be endlessly adapted to suit different preferences or what you have on hand. For a southwestern twist, add black beans, corn, avocado, and lime juice. Create a mushroom-swiss variation by sautéing sliced mushrooms with a splash of Worcestershire sauce before adding them to the bowl, then top with Swiss cheese instead of cheddar. For a breakfast-inspired option, add a fried egg with a runny yolk that creates an additional sauce element when broken. Lower-carb eaters might prefer a base of cauliflower rice instead of lettuce, while those wanting more substance could use a combination of greens and roasted sweet potatoes as their foundation.
Practical Tips
Storage: Store all components separately in airtight containers. The seasoned beef will keep well refrigerated for 3-4 days, retaining its flavor without becoming dry. The caramelized onion aioli actually improves over 1-2 days as the flavors meld, and will stay fresh for up to 5 days in the refrigerator. Prep your vegetables no more than 2 days in advance to maintain crispness, and store them with a paper towel in the container to absorb excess moisture. For meal prep, consider keeping tomatoes whole and slicing them just before serving to prevent sogginess.
Reheating: The seasoned beef reheats beautifully in a microwave at 70% power for 1-2 minutes, which prevents it from becoming tough or overcooked. Alternatively, warm it in a skillet with a splash of beef broth to restore moisture and refresh the flavors. The aioli doesn’t need reheating and is best served at room temperature; remove it from the refrigerator about 15 minutes before assembling your bowls to allow the flavors to wake up and the texture to soften slightly.
Make-ahead strategy: The most efficient approach is making double batches of both the caramelized onions and the aioli. The onions freeze exceptionally well in small portions – ice cube trays are perfect for this – and can be defrosted as needed for future batches of aioli or other recipes. The hands-on time investment pays significant dividends when you have these flavor-packed components ready to elevate quick weeknight meals.
Serving suggestions: For a crowd, set up a “burger bowl bar” with all components displayed in separate serving dishes, allowing guests to build their own creations. This interactive approach works especially well for families with varying preferences or dietary restrictions. For a more elegant presentation for dinner guests, consider serving individual pre-assembled bowls with the aioli in a small ramekin on the side, allowing each person to add their desired amount.
Common Questions
Can I make these dairy-free? Absolutely – the most common dairy component would be cheese, which can be eliminated or substituted with dairy-free cheese alternatives. The caramelized onions can be made with olive oil instead of butter with minimal flavor difference. The aioli is traditionally dairy-free when made with standard mayonnaise, but check your specific brand to be certain. With these simple adjustments, you’ll maintain all the burger flavors while accommodating dairy restrictions.
How can I add more vegetables without changing the burger experience? Finely chopped mushrooms mixed with the ground beef before cooking (about 1/4 cup per pound) add moisture, nutrition, and umami flavor while remaining virtually undetectable. Grated zucchini (with moisture squeezed out) works similarly. For toppings, avocado provides healthy fats and creamy texture that complements the burger profile, while roasted red peppers offer sweetness similar to ketchup but with more nutritional value.
What’s the best way to meal prep these for the work week? Prepare a large batch of seasoned beef and portion it into containers once cooled. Make the caramelized onion aioli and store in a squeezable container for easy distribution. Wash and dry lettuce thoroughly, then wrap in paper towels inside a large storage container – properly dried lettuce will stay crisp for several days. Pre-slice sturdy vegetables like bell peppers, but leave tomatoes whole until the day of serving. Each morning, quickly assemble your bowl with pre-portioned components, keeping the aioli in a separate small container to add just before eating.
Can I use ground turkey or chicken instead of beef? Yes, leaner proteins work well, but require slight adjustments. Add 1-2 tablespoons of olive oil to the pan before cooking to compensate for the lower fat content. Increase the seasonings by about 25% since poultry has a milder flavor that benefits from more assertive spicing. Consider adding 1 teaspoon of Worcestershire sauce or coconut aminos to the meat while cooking to introduce some of the umami notes naturally present in beef. The final texture will be slightly different, but still delicious with these modifications.
Serving Suggestions
These bowls are substantial enough to stand alone as a complete meal, but they pair wonderfully with oven-baked sweet potato fries or zucchini chips if you’re looking for a side dish. For something lighter, a simple cucumber salad dressed with vinegar and dill provides a refreshing contrast to the rich flavors in the bowl. If you’re serving this for a gathering, consider small cups of tomato soup as a starter that plays into the classic burger-and-tomato pairing while adding elegance to the meal progression.
Nutritional Benefits
Beyond being delicious, these bowls offer solid nutritional advantages. By eliminating the traditional burger bun, you’re reducing refined carbohydrates while maintaining satisfying flavors. The ground beef provides complete protein and important nutrients like iron, zinc, and B vitamins. The romaine lettuce base contributes fiber, vitamin A, and vitamin K, while tomatoes add lycopene, a powerful antioxidant. By controlling your own ingredients and portions, you’re creating a meal that can be tailored to specific nutritional goals while still delivering the emotional satisfaction of comfort food – truly the best of both worlds.