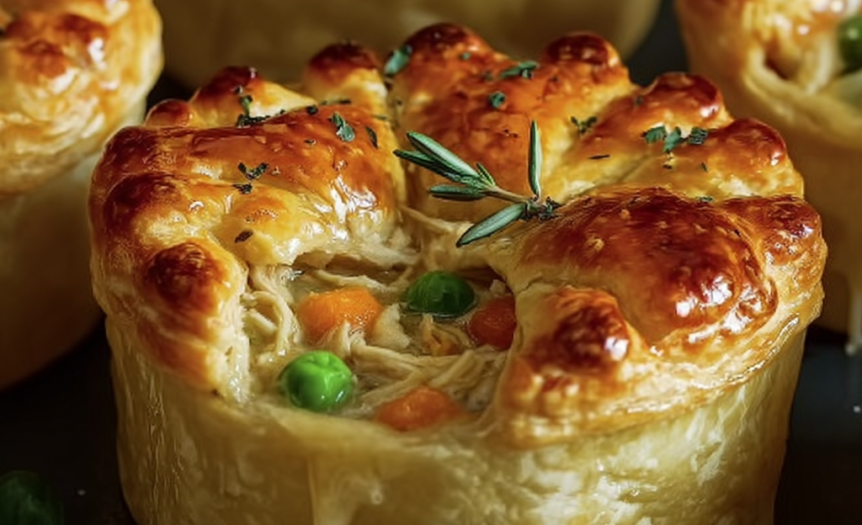
When autumn air starts to carry that first hint of winter chill and you find yourself craving something warm and comforting, few things satisfy quite like homemade chicken pot pie. These mini versions take everything wonderful about the classic comfort food and transform it into perfectly portioned, hand-held bundles of joy that are as practical as they are delicious.
I stumbled upon this recipe during one of those hectic weeknight moments when my family was asking for “real food” but I only had thirty minutes to make it happen. The inspiration struck when I realized that individual-sized pot pies would not only cook faster than a traditional large pie, but they’d also be infinitely more fun to eat and easier to serve. The first batch disappeared so quickly that I immediately started planning when I could make them again.
What makes these mini chicken pot pies truly special is how they concentrate all the beloved flavors of traditional pot pie—tender chicken, creamy sauce loaded with vegetables, and that irresistible buttery, flaky crust—into perfect individual portions. Each bite delivers the complete pot pie experience, from the satisfying crunch of golden pastry to the rich, savory filling that warms you from the inside out.
This recipe yields 12 mini pot pies using a standard muffin tin, making it perfect for families, entertaining, or meal prep. They bake in just 20-25 minutes, which means you can have homemade comfort food on the table faster than ordering takeout, and with ingredients you likely already have in your kitchen.
Ingredients
For the Filling:
- 2 cups cooked chicken, shredded or diced
- 1 cup frozen mixed vegetables (peas, carrots, corn)
- ⅓ cup yellow onion, finely diced
- 2 tablespoons unsalted butter
- 2 tablespoons all-purpose flour
- 1 cup low-sodium chicken broth
- ½ cup whole milk
- ½ teaspoon salt
- ¼ teaspoon black pepper
- ½ teaspoon garlic powder
- ¼ teaspoon dried thyme
- ¼ teaspoon dried sage
For the Crust:
- 1 package refrigerated pie crusts (2 crusts), thawed
- 1 large egg, beaten
Optional Garnish:
- Fresh thyme sprigs
- Flaky sea salt
Instructions
Preheat your oven to 375°F and generously grease a standard 12-cup muffin tin with butter or cooking spray. This step is crucial for easy removal once the pies are baked—nothing ruins the joy of mini pot pies like having them stick to the pan.
Begin by preparing the creamy filling that forms the heart of these pot pies. In a large skillet over medium heat, melt the butter until it’s foaming and fragrant. Add the diced onion and sauté for 2-3 minutes until softened and translucent, stirring occasionally to prevent browning.
Sprinkle the flour over the softened onions and stir constantly for about 1 minute to create a roux. This cooking step eliminates the raw flour taste and creates the foundation for a smooth, lump-free sauce. The mixture should smell nutty and look slightly golden.
Gradually whisk in the chicken broth, adding it slowly at first to prevent lumps from forming. Once the broth is fully incorporated, add the milk while continuing to whisk. The mixture will look thin initially, but don’t worry—it will thicken beautifully as it cooks.
Continue stirring the sauce over medium heat for 3-4 minutes until it thickens enough to coat the back of a spoon. The consistency should be similar to a light gravy—thick enough to cling to the chicken and vegetables but not so thick that it becomes gluey.
Remove the skillet from heat and stir in the shredded chicken, frozen vegetables, salt, pepper, garlic powder, thyme, and sage. Mix everything thoroughly until the chicken and vegetables are well-coated with the creamy sauce. Taste and adjust seasonings as needed—the filling should be savory and well-seasoned since the crust will be relatively neutral.
Set the filling aside to cool slightly while you prepare the crusts. This cooling period prevents the hot filling from melting the pastry during assembly.
Unroll the thawed pie crusts on a lightly floured surface. Using a round cookie cutter or large glass (about 4 inches in diameter), cut 12 circles for the bottom crusts. These should be large enough to line the muffin cups with a slight overhang.
Gently press each circle into a muffin cup, allowing the excess dough to hang over the edges slightly. Don’t worry about making them perfectly even—the rustic look adds to their charm.
Cut 12 smaller circles (about 3 inches in diameter) from the remaining pastry for the top crusts. These will cover the filling and create the classic pot pie appearance.
Spoon the chicken filling evenly among the pastry-lined muffin cups, filling each about ¾ full. Don’t overfill, as this can cause the pies to burst during baking or make them difficult to seal properly.
Place the smaller pastry circles over the filling, then gently press the edges together to seal. Use your fingers or a fork to crimp the edges, creating both a seal and an attractive border. Cut a small slit or make a few holes in the center of each top crust to allow steam to escape during baking.
Brush the tops of all the mini pies with the beaten egg, which will create that beautiful golden-brown, glossy finish that makes them look professionally made.
Bake for 20-25 minutes, or until the crusts are golden brown and the filling is bubbling around the edges. The pastry should be fully cooked and crispy, not pale or doughy.
Allow the pies to cool in the muffin tin for 5-10 minutes before carefully removing them. This cooling period helps the filling set slightly and prevents the pies from falling apart when you take them out.

Flavor and Texture Notes
These mini chicken pot pies deliver all the comfort and satisfaction of traditional pot pie in a perfectly portioned package. The filling achieves that ideal balance of creamy richness and savory depth that makes pot pie such a beloved comfort food. The chicken stays tender and juicy, while the mixed vegetables provide color, nutrition, and textural variety that keeps each bite interesting.
The sauce strikes the perfect consistency—thick enough to coat everything beautifully without being heavy or gluey, with enough flavor to make the filling taste like something you’d find at a high-end comfort food restaurant. The herbs add aromatic complexity that elevates the dish beyond simple chicken and vegetables.
The pastry crust provides that essential textural contrast with its flaky, buttery layers that shatter delicately when you bite through them. The bottom crust stays crisp despite the moist filling, while the top develops a beautiful golden color and satisfying crunch that makes these pies as appealing to look at as they are to eat.
Each mini pie delivers the complete pot pie experience in every bite—you get crust, filling, vegetables, and tender chicken all together, creating that perfect harmony of flavors and textures that makes this dish so irresistible.
Tips and Variations
Using rotisserie chicken is a real time-saver that also adds extra flavor to the filling. Simply remove the skin and shred the meat into bite-sized pieces. Leftover roasted or grilled chicken works beautifully too—just make sure it’s properly seasoned and moist.
Don’t overfill the pastry cups, as this can cause the pies to burst during baking or prevent proper sealing. About 2-3 tablespoons of filling per pie is the ideal amount for perfect results.
For extra-flaky crusts, keep the pastry as cold as possible during assembly. If the kitchen is warm, you can even chill the assembled pies for 15 minutes before baking to help maintain the pastry’s structure.
Create a turkey pot pie variation by substituting cooked turkey for the chicken—this makes an excellent use for Thanksgiving leftovers. For a vegetarian version, replace the chicken with sautéed mushrooms, diced potatoes, and fresh spinach, using vegetable broth instead of chicken broth.
Add a cheesy twist by stirring ½ cup of shredded cheddar or Gruyère cheese into the filling just before assembling. The cheese adds richness and creates an even more indulgent comfort food experience.
Storage and Make-Ahead Tips
These mini pot pies are excellent for make-ahead meals and meal prep. You can assemble them completely and refrigerate for up to 24 hours before baking—just add an extra 5 minutes to the baking time if they’re going into the oven cold.
For longer storage, wrap cooled, baked pies individually in aluminum foil and freeze for up to 2 months. They reheat beautifully in a 350°F oven for 15-20 minutes from frozen, or 10-12 minutes if thawed first.
Leftover baked pies can be stored in the refrigerator for up to 3 days and reheated in the oven at 350°F for 8-10 minutes until warmed through. Avoid microwaving if possible, as it can make the crust soggy.
The filling can be made up to 2 days ahead and stored in the refrigerator, making assembly day much quicker. Just bring it to room temperature before filling the pastry shells.
Serving Suggestions
These mini pot pies are substantial enough to serve as a complete meal, especially when paired with a simple side salad or steamed vegetables. Their individual size makes them perfect for casual entertaining—guests can easily grab one and eat it with just a fork and napkin.
For a more formal presentation, serve them on individual plates with a small side of roasted vegetables like asparagus or green beans. A light salad with vinaigrette provides a nice contrast to the rich, creamy filling.
They’re ideal for potlucks, holiday buffets, or casual gatherings where people are standing and mingling. The hand-held size makes them much more practical than traditional pot pie for these situations.
Consider serving them with classic comfort food sides like mashed potatoes or roasted root vegetables for the ultimate cozy meal experience.
FAQ
Can I use puff pastry instead of pie crust? Absolutely! Puff pastry creates an even flakier, more elegant result. Just be aware that it puffs up more during baking, so you may need to adjust the size of your pastry circles slightly. The baking time remains the same.
What if I don’t have a muffin tin? You can use ramekins or small oven-safe bowls instead. Just adjust the baking time as needed based on the size of your containers. Individual tart pans also work beautifully for a more refined presentation.
Can I make these gluten-free? Yes! Simply substitute gluten-free pie crust and use cornstarch or a gluten-free flour blend instead of all-purpose flour for thickening the sauce. The cornstarch should be mixed with a little cold liquid before adding to prevent lumps.
How do I prevent soggy bottom crusts? Make sure your muffin tin is well-greased, don’t overfill the pies, and allow them to cool slightly before removing from the tin. You can also brush the bottom crusts with beaten egg before adding the filling for extra protection.
Can I add other vegetables to the filling? Definitely! Diced potatoes, celery, mushrooms, or bell peppers all work well. Just make sure any additional vegetables are cooked before adding them to the filling, and adjust the sauce quantity as needed to accommodate extra ingredients.
These easy mini chicken pot pies prove that comfort food can be both practical and special. They take everything wonderful about traditional pot pie and make it more accessible for busy families while losing none of the warmth and satisfaction that makes this dish such a beloved classic. Whether you’re making them for a cozy family dinner or preparing a batch for the freezer, these little pies deliver big comfort in perfect individual portions. The combination of flaky pastry, creamy filling, and tender chicken creates the kind of meal that turns an ordinary evening into something memorable—exactly what the best comfort food should do.