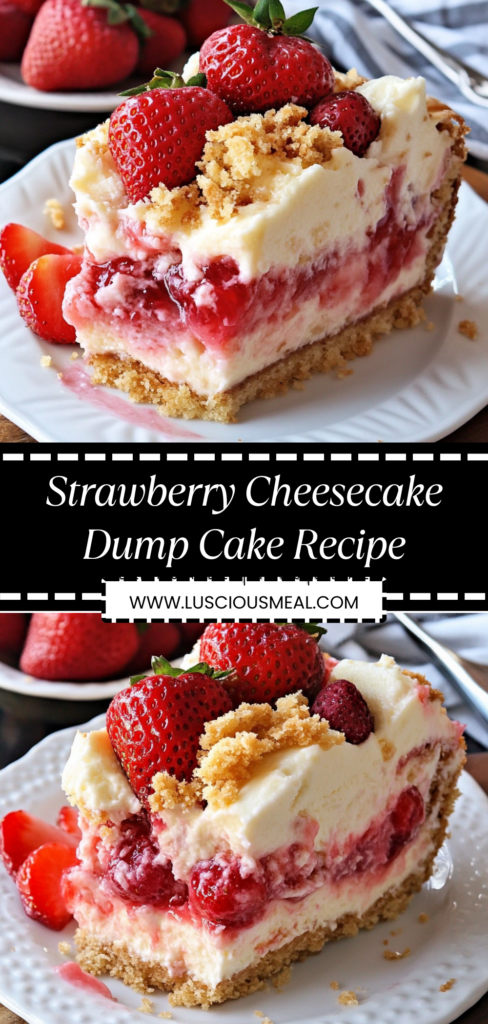
This strawberry cheesecake dump cake combines the indulgent flavor of creamy cheesecake with juicy strawberries and buttery cake topping in a dessert that involves little more than measuring and pouring. The layers magically transform during baking into a dessert with distinct textures and complementary flavors – no mixer or complex techniques required. If you enjoy effortless yet impressive desserts, you might also like peach cobbler dump cake, cherry chocolate dump cake, or blueberry lemon dump cake.
Why You’ll Love This Recipe
- Genuinely simple preparation – lives up to the “dump” name with only 5 minutes of hands-on time, making it accessible for even the most inexperienced bakers or those short on time
- Impressive taste-to-effort ratio – delivers the complex flavor profile of cheesecake and fruit desserts without any of the traditional fussiness or technical challenges
- Adaptable for any season – works beautifully with fresh strawberries during peak season or frozen berries year-round with virtually identical results
- Crowd-pleasing versatility – serves equally well as a casual family dessert or dressed up with vanilla ice cream for dinner guests who will never guess how easily it came together
Ingredients Breakdown
Strawberries: The star of this dessert, providing juicy sweetness and vibrant color that makes the cake visually appealing. Fresh berries deliver the brightest flavor when in season, but frozen strawberries work remarkably well and are actually preferable for consistent results as they’re picked at peak ripeness. The natural pectin in strawberries helps create a jammy layer during baking that contrasts beautifully with the creamy cheesecake portion. When using frozen berries, do not thaw them first – their moisture will release naturally during baking, creating the perfect sauce consistency. If using fresh strawberries, hull and quarter them for even cooking. For enhanced flavor, toss the berries with 1 tablespoon of lemon juice, which brightens their natural sweetness and helps preserve their color during baking.
Cream cheese: The essential ingredient that transforms an ordinary dump cake into a cheesecake-inspired dessert. Full-fat cream cheese provides the richest, most authentic cheesecake flavor and the creamiest texture after baking. The tanginess of cream cheese balances the sweetness of the berries and cake mix, creating a more sophisticated flavor profile than standard fruit desserts. Temperature is crucial here – the cream cheese must be fully softened to room temperature to ensure it blends smoothly with the other ingredients without leaving lumps. This typically requires removing it from the refrigerator at least an hour before preparation, though cutting it into small cubes can speed this process. In a pinch, unwrapped cream cheese can be microwaved in 10-second intervals until just softened but not melted.
Cake mix: The convenience cornerstone of this recipe, providing consistent structure and flavor without measuring multiple dry ingredients. A white or vanilla cake mix offers the most neutral base that lets the strawberry and cheesecake flavors shine, though a yellow cake mix works well too, contributing a slightly more buttery flavor. The dry cake mix contains precisely balanced leavening agents, flour, and sugar that activate during baking to create a tender cake layer. Do not prepare the cake mix according to package directions – it’s used completely dry in this recipe, where it will absorb moisture from the other ingredients and butter to form the perfect topping texture.
Butter: Critical for both flavor and the transformation of dry cake mix into a golden, crisp topping. Unsalted butter allows you to control the overall salt level in the dessert, though salted butter can be substituted if it’s what you have on hand. The butter must be melted for proper distribution throughout the cake mix, but it should not be hot when added or it can start cooking the ingredients prematurely. The fat in butter carries flavor compounds, promotes browning through the Maillard reaction, and creates the tender yet slightly crisp texture that defines the top layer of a perfect dump cake. For the most even coverage, pour the melted butter in a zigzag pattern over the cake mix rather than in one spot.
Sugar: While strawberries provide natural sweetness, additional sugar ensures the perfect balance and helps create the jammy consistency in the fruit layer. Granulated sugar works perfectly for this purpose, though brown sugar can substitute for a deeper molasses note that pairs beautifully with the berries. The sugar also aids in breaking down the strawberries’ cell walls during baking, helping them release their juices and meld with the other components. For reduced sweetness, the amount can be decreased by up to half, particularly when using very ripe strawberries or if serving the dessert with sweetened whipped cream or ice cream.
Step-by-Step Instructions
- Begin by preheating your oven to 350°F (175°C) and positioning a rack in the center. Proper oven temperature is crucial for this recipe – too hot and the top will brown before the layers underneath have fully developed; too cool and the cake mix won’t properly activate, leaving a raw flour taste. While waiting for the oven to reach temperature, gather your ingredients and prepare your baking dish by lightly coating a 9×13-inch glass or ceramic baking dish with cooking spray. The light coating prevents sticking without adding significant grease that could make the dessert too heavy.
- In a medium bowl, beat together 8 ounces of fully softened cream cheese, 1/2 cup granulated sugar, 1 teaspoon vanilla extract, and 2 eggs until well combined and mostly smooth. Don’t worry about achieving a perfectly smooth mixture as you would with traditional cheesecake – slight texture adds character to this rustic dessert, and any remaining small lumps will melt during baking. The eggs provide structure to the cheesecake layer while also contributing richness, and the vanilla enhances the perception of sweetness without adding additional sugar.
- Spread the cream cheese mixture evenly across the bottom of the prepared baking dish, using a spatula to create a relatively even layer. Perfect smoothness isn’t necessary, but try to reach all corners of the dish to ensure every serving has some cheesecake component. This layer should be approximately 1/4 inch thick throughout the dish, creating the base for the remaining ingredients to build upon.
- Place 4 cups of strawberries (fresh or frozen) on top of the cream cheese layer, distributing them evenly across the surface. If using fresh berries, ensure they’ve been hulled and quartered; frozen berries can be added directly without thawing. The berries should create a fairly solid layer, with pieces touching but not piled on top of each other, which ensures even cooking and proper juice distribution. If the berries are particularly tart, sprinkle an additional 2 tablespoons of sugar directly over them at this stage.
- Sprinkle 1/2 cup granulated sugar evenly over the strawberry layer. This sugar will dissolve into the berry juices during baking, creating a sweet sauce that permeates the dessert and prevents the fruit from tasting too tart against the creamy cheesecake. The fine crystals distribute more evenly than larger sugar varieties, ensuring consistent sweetness throughout.
- Evenly distribute the dry cake mix over the strawberry layer, creating a complete blanket of the powder that reaches all the way to the edges of the dish. Do not press down or compact the cake mix – it should rest lightly on top of the berries. Take care to break up any large lumps in the cake mix before sprinkling, as these can result in pockets of dry mix in the finished dessert. This dry layer will gradually absorb moisture from the berries below and butter above, transforming into a tender cake during baking.
- Pour 3/4 cup (1 1/2 sticks) of melted, slightly cooled butter evenly over the cake mix, trying to cover as much of the surface as possible. The butter should be poured in a zigzag pattern to promote even distribution rather than concentrated in one area. Some dry spots are normal and expected – do not mix or stir the layers at this point, as the separation is what creates the distinctive textures in the final dessert. Any small remaining dry spots will disappear during baking as moisture from the fruit layer rises.
- For added texture and visual appeal, sprinkle 1/2 cup of chopped nuts (walnuts or pecans work beautifully) over the butter layer if desired. This optional addition creates a pleasant crunch that contrasts with the soft layers beneath and adds a toasted flavor note that complements both the strawberries and the cheesecake. The nuts will toast during baking, intensifying their flavor and aroma.
- Place the baking dish on a larger rimmed baking sheet before putting it in the oven. This precaution catches any potential overflow from bubbling fruit juices, protecting your oven from messy spills. The baking sheet also helps distribute heat more evenly to the bottom of your dish, promoting consistent cooking throughout the dessert.
- Bake for 45-50 minutes until the top is golden brown and the edges are bubbling visibly. The exact timing will depend on your particular oven and whether you used fresh or frozen berries. The dessert is done when the cake layer no longer appears wet or raw, even in the center, and has taken on a rich golden hue. If the top begins browning too quickly before the full baking time is complete, loosely cover with aluminum foil for the remaining duration.
- Once baked, remove from the oven and place on a wire rack to cool for at least 30 minutes before serving. This cooling period is essential as it allows the layers to set properly – serving too soon results in a runny dessert that doesn’t hold its shape. During cooling, the fruit layer thickens slightly as the natural pectins in the strawberries gel, and the cheesecake layer firms up to a sliceable consistency.
- Serve warm or at room temperature, though many prefer it slightly warm when the contrast between the cool, creamy cheesecake layer and the warm fruit is most pronounced. For an extra-special presentation, top each serving with a dollop of whipped cream or a small scoop of vanilla ice cream, which melts slightly into the warm dessert creating an additional sauce element.
Perfect Texture: What to Look For
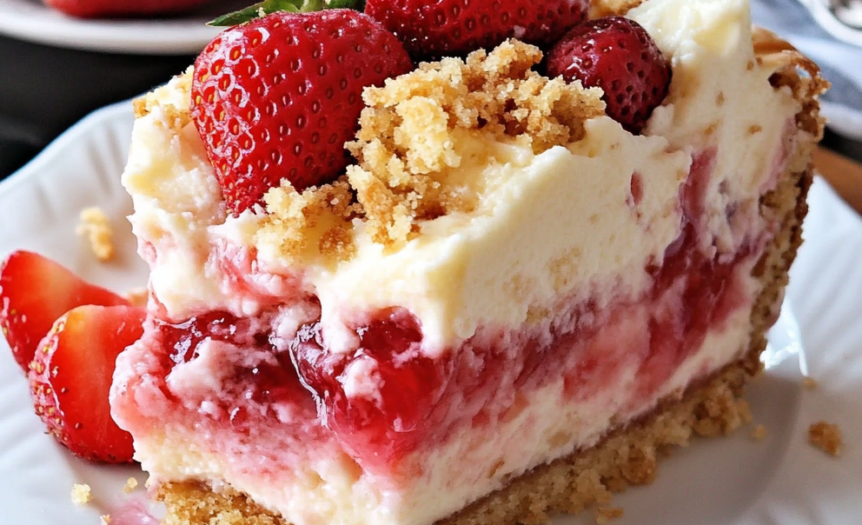
The hallmark of a successful strawberry cheesecake dump cake is the distinct layering of textures. When properly baked, you should be able to identify three distinct components: a creamy, slightly firm cheesecake layer on the bottom; a middle layer of juicy, jammy strawberries that hold their shape while releasing their bright flavor; and a top layer with a texture somewhere between cake and soft cookie – tender in the center with slightly crisp edges where the butter has created caramelization. The fruit juices should have thickened to a sauce-like consistency rather than being watery, and the cheesecake portion should be fully set without being rubbery. When serving, a spoon should cut cleanly through all layers, and the dessert should hold its shape on the plate without being so firm that it seems dry or overbaked.
Customization Options
This versatile recipe serves as an excellent base that you can adapt to your preferences or seasonal ingredients. For a mixed berry version, substitute half the strawberries with blueberries, raspberries, or blackberries for more complex flavor and visual interest. Create a tropical variation by using a pineapple cake mix and adding 1 cup of diced mango alongside the strawberries. For a chocolate-covered strawberry inspired dessert, use a chocolate cake mix instead of vanilla and add 1/2 cup of white chocolate chips scattered over the strawberry layer. During fall, try substituting diced apples tossed with cinnamon for the strawberries and using a spice cake mix for seasonal warmth. For extra richness in the cheesecake layer, add 1/4 cup of sour cream to the cream cheese mixture before spreading it in the pan.
Practical Tips
Storage: This dump cake keeps well refrigerated for up to 4 days, though the cake topping will gradually soften as it absorbs moisture from the fruit layer. Cover leftovers with plastic wrap or transfer to an airtight container before refrigerating. Due to the cream cheese component, never leave this dessert at room temperature for more than two hours for food safety reasons. The flavor actually improves after a day as the components meld together, making this an excellent make-ahead dessert for gatherings.
Reheating: For the best texture when enjoying leftovers, allow individual portions to come to room temperature for about 15 minutes before reheating. Then warm in a microwave at 50% power for 20-30 seconds, just enough to take the chill off without making it hot, which would cause the cheesecake layer to become too soft. Alternatively, cover the entire dish with foil and warm in a 300°F oven for about 10 minutes. Cold leftovers also make a delicious breakfast treat similar to a fruit danish when paired with coffee.
Frozen berry tips: When using frozen strawberries, keep them frozen until the moment you add them to the dish. Thawing causes them to release their juices prematurely, which can make the dessert soggy. If your frozen berries are whole rather than sliced, either chop them while still frozen or look for already sliced varieties to ensure even cooking. Frozen berries often release more liquid during baking than fresh, so if using them, you might increase the baking time by 5-10 minutes to ensure proper setting of all layers.
Cake mix distribution: For the most even cake layer, pour the dry mix into a separate bowl and whisk it briefly to break up any lumps before sprinkling over the strawberry layer. This extra step takes only seconds but makes a significant difference in the final texture. To prevent any dry spots in the finished dessert, you can mix 1/4 cup of melted butter directly into the cake mix before sprinkling it over the berries, then pour the remaining 1/2 cup of butter over the top as directed.
Common Questions
Can I use other fruits instead of strawberries? Absolutely – this adaptable recipe works well with many fruits. Peaches, cherries, blueberries, or mixed berries are all excellent substitutes in equal quantities. Fruits with high water content like watermelon are not recommended as they release too much liquid during baking. When substituting more tart fruits like cherries or blackberries, consider increasing the sugar by 2-4 tablespoons to maintain the sweet-tart balance. For fruits that brown easily like apples or pears, toss them with 1 tablespoon of lemon juice before adding to the dish.
Why did my cake mix not cook properly, leaving dry patches on top? This typically occurs when the butter doesn’t fully cover the cake mix during preparation. To prevent this, either increase the butter to 1 cup (2 sticks) total, mix 1/4 cup of the melted butter directly into the cake mix before sprinkling it over the berries, or spray the visible dry patches lightly with cooking spray halfway through baking. Remember that some slight variation in the top texture is characteristic of dump cakes and adds to their rustic charm.
Can I make this recipe ahead of time for a gathering? Yes, this dessert works exceptionally well prepared in advance. You have two options: assemble completely and bake up to one day ahead, then refrigerate and serve cold or at room temperature; or prepare through step 7 (adding the butter), cover with plastic wrap, refrigerate for up to 24 hours, and bake just before serving. The second method requires adding about 5-10 minutes to the baking time since you’re starting with cold ingredients. The flavor actually improves after the components have had time to meld together overnight.
How do I prevent the cheesecake layer from curdling or becoming rubbery? The key factors are proper mixing temperature and avoiding overbaking. Ensure your cream cheese is fully softened before mixing to achieve a smooth consistency without needing to overmix, which can incorporate too much air. Eggs should be at room temperature as well for seamless incorporation. If the top of your cake is browning but you’re concerned the cheesecake layer isn’t set, cover with foil and continue baking. Finally, allow the dessert to cool gradually at room temperature rather than rushing the process in the refrigerator, which can cause the texture to become dense.
Serving Suggestions
This versatile dessert shines in multiple serving styles depending on the occasion. For a casual family dessert, serve warm squares in bowls with a light dusting of powdered sugar on top. For a more elegant presentation, allow the cake to cool completely, then cut clean squares using a knife dipped in hot water and wiped clean between cuts, topped with fresh sliced strawberries and mint leaves. Enhance the cheesecake element by serving with a dollop of lightly sweetened whipped cream stabilized with a touch of cream cheese for a tangy complement to the sweet fruit.
The temperature at which you serve this dessert significantly impacts the experience: warm servings highlight the contrast between the warm cake and cool cream additions, while room temperature servings offer the clearest distinction between the three primary layers. For the ultimate indulgence, serve warm with a scoop of vanilla ice cream, which creates a fourth textural and temperature element as it melts into the still-warm cake. For brunch applications, serve chilled squares alongside coffee for a danish-like treat that isn’t overly sweet for morning consumption.
Nutritional Benefits
While this dessert falls firmly in the treat category, it does offer some nutritional advantages over many commercial alternatives. The substantial amount of strawberries provides vitamin C, dietary fiber, and antioxidants, particularly anthocyanins that give strawberries their vibrant red color. The cream cheese contributes calcium and protein, making this a more satisfying dessert that doesn’t lead to sugar crashes. By controlling the ingredients yourself, you avoid the artificial flavors, colors, and preservatives found in many pre-made desserts.
For a slightly healthier version, reduce the sugar by 1/4 cup without significantly affecting the taste, especially when strawberries are at peak season sweetness. Substitute part of the butter with unsweetened applesauce at a 1:1 ratio for up to half the total amount to reduce fat while maintaining moisture. Adding the optional nuts increases the protein and healthy fat content, creating a more nutritionally balanced indulgence that satisfies with a reasonable portion size, helping prevent overindulgence in less nutritious sweet options.

