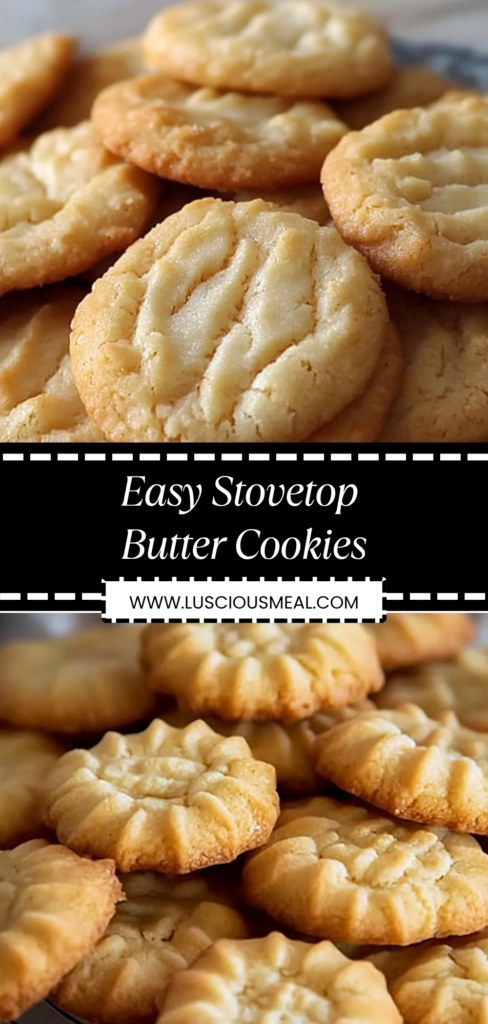
These easy stovetop butter cookies deliver all the rich, buttery satisfaction of traditional baked cookies using just a skillet and simple pantry ingredients. The gentle stovetop cooking creates tender, melt-in-your-mouth cookies with golden edges and a delicate crumb that rivals any oven-baked version. If you enjoy this style of no-oven baking, you might also like stovetop shortbread, pan-fried sugar cookies, or other skillet desserts that make homemade treats accessible without specialized equipment.
Why You’ll Love This Recipe
- No oven required – perfect for hot summer days, small kitchens, or situations where oven use isn’t practical, while still delivering authentic cookie satisfaction
- Quick and simple – comes together in under 30 minutes using basic ingredients and techniques that anyone can master with minimal equipment
- Rich, buttery flavor – the stovetop method allows for careful temperature control that creates perfectly tender texture and concentrated butter taste
- Small batch friendly – makes just the right amount for immediate enjoyment without the temptation of dozens of cookies sitting around
Ingredients Breakdown
High-quality butter: The star ingredient that provides both flavor and structure in these simple cookies. Use unsalted European-style butter with higher fat content for the richest flavor and best texture, though standard unsalted butter works excellently too. The butter should be at room temperature for easy creaming but not so soft that it’s melting. Quality matters significantly in butter cookies since it’s the primary flavor, so choose the best you can afford. The butter creates both the rich taste and tender texture that defines exceptional butter cookies.
All-purpose flour: Provides the structure necessary for cookies that hold together while maintaining tender texture. Measure flour accurately by spooning it into measuring cups and leveling off rather than scooping directly, which can pack too much flour and create dense cookies. The protein content in all-purpose flour is perfect for butter cookies – enough structure without the toughness that bread flour might create. Sift the flour if it seems particularly lumpy to ensure smooth mixing.
Powdered sugar: Creates the delicate, melt-in-your-mouth texture that distinguishes butter cookies from other cookie types. Powdered sugar dissolves more easily than granulated sugar and contains a small amount of cornstarch that contributes to the tender crumb. The fine texture also helps create the characteristic pale color of traditional butter cookies. Sift the powdered sugar if it contains lumps to ensure smooth mixing and prevent grittiness in the finished cookies.
Vanilla extract: Enhances the butter flavor while adding warm, aromatic depth that makes these simple cookies more complex and interesting. Pure vanilla extract provides superior flavor to imitation vanilla, with complex notes that complement the rich butter beautifully. The amount should be noticeable but not overwhelming – enough to enhance the other flavors without masking the primary butter character. High-quality vanilla extract makes a noticeable difference in the final flavor.
Salt: Essential for enhancing all other flavors and preventing the cookies from tasting flat or one-dimensional. Even a small amount of salt brings out the sweetness and butter flavor while adding complexity that makes the cookies more satisfying. Fine sea salt or table salt works well – the key is using just enough to enhance without making the cookies taste salty.
Step-by-Step Instructions
- In a medium mixing bowl, cream together 1/2 cup (1 stick) room temperature unsalted butter with 1/4 cup powdered sugar using a wooden spoon or electric mixer until light and fluffy, about 3-4 minutes. The mixture should be noticeably lighter in color and increased in volume when properly creamed. This step incorporates air that helps create the tender texture essential to good butter cookies.
- Add 1 teaspoon pure vanilla extract and 1/4 teaspoon salt to the creamed butter mixture, beating until well combined. The mixture should be smooth and uniform without any streaks of unmixed ingredients. The vanilla and salt should be fully incorporated to ensure even flavor distribution throughout the cookies.
- Gradually add 1 cup all-purpose flour to the butter mixture, mixing just until a soft dough forms. Don’t overmix, which can develop gluten and create tough cookies instead of the desired tender texture. The dough should come together easily but not be sticky or wet. If it seems too dry, add a teaspoon of milk; if too wet, add a tablespoon of flour.
- Turn the dough onto a lightly floured surface and gently knead 2-3 times just to bring it together into a cohesive mass. Shape the dough into a log about 6 inches long and 2 inches in diameter. Wrap in plastic wrap and refrigerate for 15-20 minutes to firm up slightly, making it easier to slice cleanly.
- Remove the chilled dough from the refrigerator and slice into rounds approximately 1/4 inch thick using a sharp knife. Clean the knife between cuts if dough starts to stick. You should have about 16-20 cookies depending on thickness. Try to keep the slices uniform for even cooking.
- Heat a large, heavy-bottomed skillet or cast-iron pan over medium-low heat. The pan should be large enough to hold 6-8 cookies without crowding. Test the temperature by sprinkling a tiny bit of flour into the pan – it should sizzle gently but not brown immediately. Proper temperature control is crucial for even cooking without burning.
- Lightly grease the skillet with a small amount of butter or cooking spray. Place the cookie slices in the pan, leaving space between each one to prevent sticking together. Don’t overcrowd the pan, which can cause uneven cooking and make flipping difficult.
- Cook the cookies for 3-4 minutes on the first side until the bottoms are lightly golden brown. The edges should look set and slightly firm. Carefully flip each cookie using a thin spatula, being gentle to prevent breaking. The cookies will be delicate while hot.
- Cook for an additional 2-3 minutes on the second side until lightly golden and cooked through. The cookies should feel set but not hard – they’ll continue to firm up as they cool. Total cooking time should be 6-7 minutes per batch, though this varies based on thickness and heat level.
- Transfer the cooked cookies to a wire rack to cool completely. They’ll be quite soft when hot but will firm up to the perfect tender texture as they cool. Repeat the cooking process with remaining dough, adjusting heat as needed to prevent burning. Let the pan cool slightly between batches if it gets too hot.
Perfect Texture: What to Look For
Successfully executed stovetop butter cookies should have a tender, melt-in-your-mouth texture that’s neither crumbly nor dense. The cookies should be lightly golden on both sides with even browning that indicates proper cooking temperature. When cooled, they should hold together well when picked up but yield easily when bitten, practically dissolving on the tongue. The texture should be fine and delicate, similar to shortbread but slightly more tender due to the gentle stovetop cooking method. There should be no raw flour taste, and the butter flavor should be prominent and rich throughout.
Customization Options
This simple base recipe adapts beautifully to various flavor additions and modifications. For citrus butter cookies, add 1 tablespoon lemon or orange zest to the dough before adding flour. Create almond butter cookies by substituting 1/2 teaspoon almond extract for half the vanilla. For chocolate chip variations, fold in 1/4 cup mini chocolate chips after adding the flour. Spiced versions can include 1/2 teaspoon cinnamon, cardamom, or other warm spices. Roll the dough log in chopped nuts or colored sugar before slicing for different textures and appearances.
Practical Tips
Temperature control: Maintaining proper heat is crucial for even cooking without burning. The pan should be hot enough to cook the cookies but not so hot that they brown too quickly. If cookies are browning too fast, reduce heat and continue cooking more slowly.
Dough consistency: The dough should be soft but not sticky. If your kitchen is very warm, the butter may be too soft – chill the dough longer to make it easier to handle. If the dough cracks when slicing, let it warm up slightly at room temperature.
Even cooking: Slice cookies to uniform thickness for consistent cooking times. Use a ruler if needed to ensure even slices. Flip carefully with a thin spatula to prevent breaking, and don’t flip too early or the cookies may fall apart.
Storage: Store completely cooled cookies in an airtight container at room temperature for up to 5 days. They can also be frozen for up to 2 months. The texture actually improves slightly after a day as flavors meld together.
Common Questions
Why are my cookies too hard or too soft? Hard cookies usually result from overcooking or too much flour, while soft cookies may be undercooked or have too much butter. Adjust cooking time and check measurements for future batches. The cookies should be tender but hold their shape when cooled.
Can I make these without chilling the dough? While chilling helps with clean slicing and easier handling, you can skip it if needed. The dough will be softer and stickier to work with, but the cookies will still taste good. Consider using a cookie scoop to portion the dough instead of slicing.
What if I don’t have powdered sugar? You can make powdered sugar by processing granulated sugar in a food processor until fine, or substitute granulated sugar in the same amount, though the texture will be slightly different – less tender and more like traditional sugar cookies.
How do I prevent sticking to the pan? Use a well-seasoned cast-iron pan or non-stick skillet, and lightly grease between batches. Don’t use too much heat, which can cause sticking, and ensure cookies are properly cooked before attempting to flip them.
Serving Suggestions
These delicate butter cookies work beautifully for afternoon tea service, arranged on pretty plates alongside other small treats. Their tender texture makes them perfect for elderly family members or anyone who has difficulty with crunchier cookies. Serve with coffee, tea, or cold milk for classic pairings that complement the rich butter flavor.
For special occasions, dust them lightly with powdered sugar or drizzle with simple glaze made from powdered sugar and milk. They also make lovely gifts when packed in decorative tins or cellophane bags tied with ribbon. The small batch size is perfect for trying the recipe or making just enough for immediate consumption without leftovers sitting around.
Nutritional Benefits
While definitely a treat, these simple butter cookies do provide some nutritional value from their quality ingredients. Real butter contributes vitamin A and beneficial fatty acids, while the flour provides some B vitamins and energy. The simple ingredient list means you’re avoiding many of the preservatives and artificial additives found in commercial cookies.
The stovetop cooking method allows for careful temperature control that may preserve more nutrients than high-heat oven baking. The moderate portion size – typically 2-3 cookies – provides satisfying indulgence without excessive calories. By making them at home with quality ingredients, you create treats that provide genuine pleasure and comfort while supporting overall well-being through the satisfaction that comes from homemade goodness made with care and attention to simple, quality ingredients.