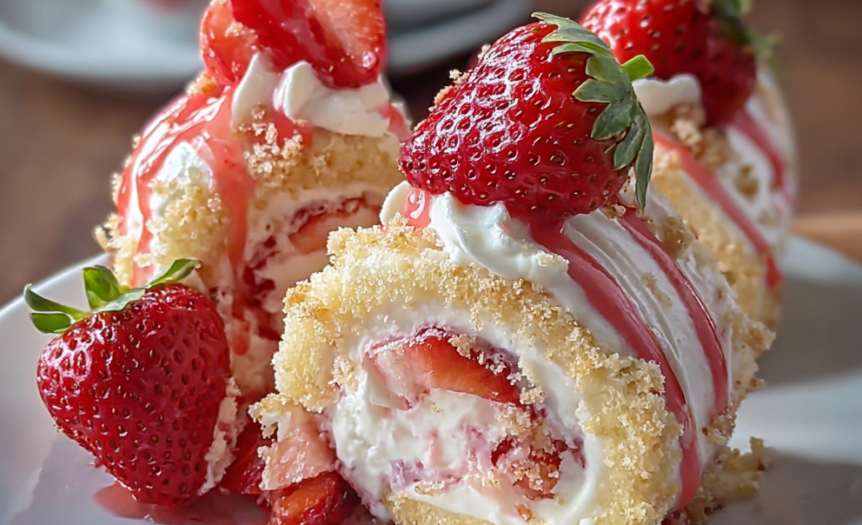
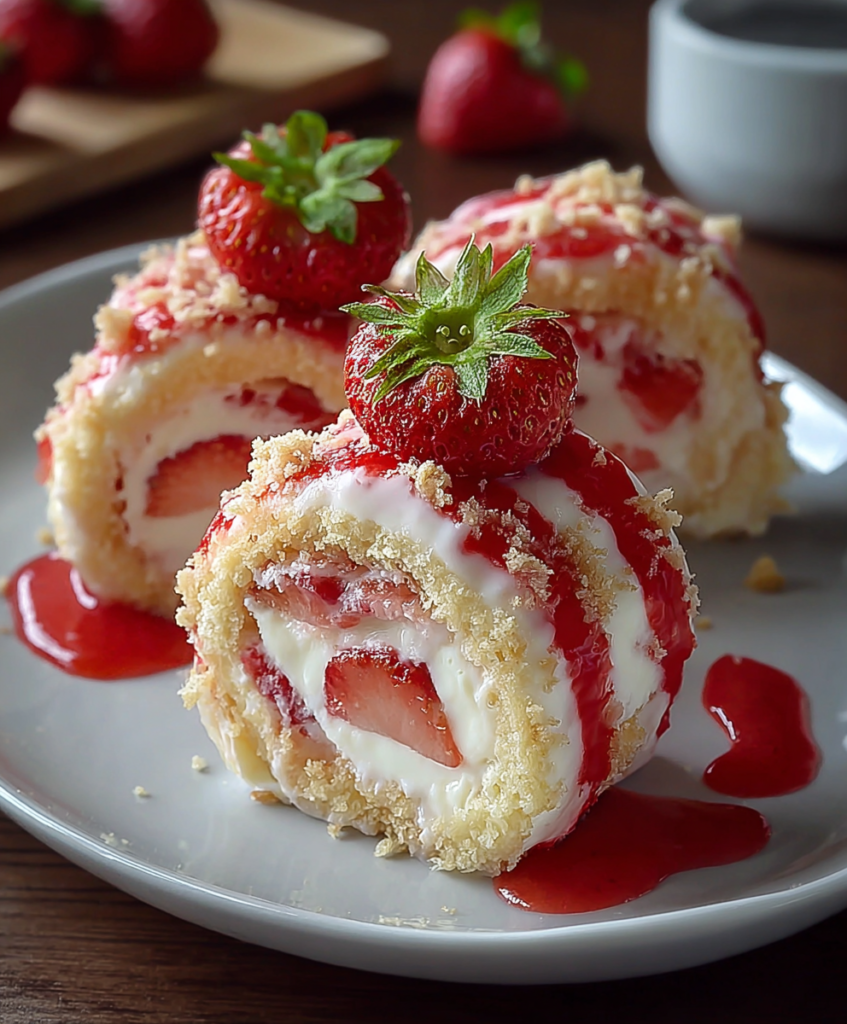
These show-stopping strawberry shortcake cheesecake rolls combine three beloved desserts into one spectacular creation that’s guaranteed to impress. A tender, vanilla-scented cake rolls around a cloud-like cheesecake filling studded with fresh strawberries, then gets topped with fluffy whipped cream and more berries for the complete shortcake experience. What makes these rolls truly special is how each component enhances the others—the light sponge cake provides structure without competing with the rich filling, while the fresh strawberries add bursts of bright flavor that cut through the creamy richness, creating perfect balance in every bite.
Ingredients
For the Cake Roll:
- 6 large eggs, separated and at room temperature
- ¾ cup granulated sugar, divided
- 1 teaspoon vanilla extract
- ¾ cup cake flour, sifted
- ¼ teaspoon salt
- ¼ cup powdered sugar (for dusting)
For the Cheesecake Filling:
- 16 oz cream cheese, room temperature
- ⅔ cup powdered sugar, sifted
- 1 teaspoon vanilla extract
- ¼ teaspoon almond extract
- 1 cup heavy whipping cream, cold
- 1 packet (¼ oz) unflavored gelatin
- 3 tablespoons warm water
- 1½ cups fresh strawberries, diced small
- 2 tablespoons granulated sugar (for strawberries)
For the Topping:
- 1½ cups heavy whipping cream
- 3 tablespoons powdered sugar
- 1 teaspoon vanilla extract
- 2 cups fresh strawberries, sliced
- Fresh mint leaves for garnish
- Additional powdered sugar for dusting
For the Strawberry Sauce (optional):
- 1 cup fresh strawberries, sliced
- ¼ cup granulated sugar
- 1 tablespoon lemon juice
- 1 teaspoon cornstarch
Instructions
Step 1: Prepare Your Workspace
Preheat your oven to 375°F and line a 15×10-inch jelly roll pan with parchment paper, leaving some overhang for easy removal. Lightly grease the parchment with butter or cooking spray.
Prepare a clean kitchen towel by dusting it generously with powdered sugar—this will be crucial for rolling the cake while it’s still warm. Position your oven rack in the center for even baking.
Step 2: Create the Perfect Sponge
In a large bowl, beat the egg yolks with ½ cup of granulated sugar until thick and pale, about 3-4 minutes. The mixture should fall in ribbons when the beaters are lifted. Beat in the vanilla extract until combined.
In a separate, spotlessly clean bowl, whip the egg whites until foamy, then gradually add the remaining ¼ cup sugar, beating until stiff, glossy peaks form. The peaks should stand straight up when the beaters are lifted—this structure is essential for a light, airy cake.
Step 3: Fold with Finesse
Sift the cake flour and salt together, then sift again directly over the egg yolk mixture. Using a large rubber spatula, gently fold the flour into the yolks until almost combined—a few streaks of flour are fine.
Add one-third of the beaten egg whites to the yolk mixture and fold gently to lighten the base. Then fold in the remaining whites in two additions, being careful not to deflate them. The batter should be light and airy with no white streaks visible.
Step 4: Bake the Foundation
Pour the batter into your prepared pan and gently spread it to the corners with an offset spatula. The layer should be even but don’t overwork it—you want to preserve those air bubbles.
Bake for 12-15 minutes, until the cake springs back lightly when touched and just begins to pull away from the sides of the pan. The surface should be lightly golden but not dark.
Step 5: Master the Roll Technique
Immediately after removing from the oven, run a knife around the edges to loosen the cake. While still hot, turn the cake out onto your powdered sugar-dusted towel. Carefully peel away the parchment paper.
Starting from one short end, roll the cake up in the towel while it’s still warm and pliable. This creates the muscle memory in the cake that prevents cracking when you roll it with filling later. Cool completely in this rolled position—about 1 hour.
Step 6: Prepare the Strawberry Enhancement
While the cake cools, dice 1½ cups of strawberries into small, uniform pieces. Toss with 2 tablespoons of granulated sugar and let them macerate for at least 30 minutes. This draws out the natural juices and intensifies the strawberry flavor.
Drain the strawberries, reserving the sweet juice for the optional sauce if desired. Pat the diced berries dry with paper towels—excess moisture will thin your cheesecake filling.
Step 7: Create the Dreamy Filling
Bloom the gelatin by sprinkling it over warm water in a small bowl. Let sit for 5 minutes until spongy, then microwave for 10-15 seconds until completely dissolved and clear. Set aside to cool slightly.
Beat the room-temperature cream cheese until completely smooth and fluffy, about 3 minutes. Gradually add the sifted powdered sugar, beating until incorporated. Mix in vanilla and almond extracts.
In a separate bowl, whip the cold heavy cream to soft peaks. Slowly drizzle in the cooled gelatin while continuing to beat until medium peaks form—the cream should hold its shape but not be stiff.
Step 8: Combine the Magic
Fold one-third of the whipped cream into the cream cheese mixture to lighten it, then gently fold in the remaining cream in two additions. The mixture should be smooth and fluffy.
Carefully fold in the drained, diced strawberries, distributing them evenly throughout the filling. Be gentle to avoid breaking the berries or deflating the cream.
Step 9: Assembly Artistry
Carefully unroll the cooled cake—it should unroll easily without cracking. If there are small cracks, don’t worry; the filling will hide them.
Spread the cheesecake filling evenly over the cake, leaving a 1-inch border on all sides. The filling will spread as you roll, so don’t overfill near the edges.
Starting from the same short end you rolled from before, carefully roll the cake up with the filling inside. Use the towel to help guide the roll, but don’t roll the towel into the cake. The seam should be on the bottom.
Step 10: Set and Chill
Wrap the completed roll tightly in plastic wrap and refrigerate for at least 4 hours, preferably overnight. This chilling time allows the filling to set completely and the flavors to meld beautifully.
The roll will hold its shape better and slice more cleanly after proper chilling. Don’t rush this step—patience here pays off in presentation.
Step 11: Final Flourishes
About 30 minutes before serving, prepare the topping by whipping the cream with powdered sugar and vanilla until soft to medium peaks form. Don’t overwhip—you want it spreadable, not stiff.
Using a sharp serrated knife, trim the ends of the roll for clean presentation, then slice into 1-inch thick rounds. Wipe the knife between cuts for neat slices.
Top each slice with a dollop of whipped cream, fresh strawberry slices, and a mint leaf. Dust lightly with powdered sugar just before serving.
Prep Time: 45 minutes | Bake Time: 15 minutes | Chill Time: 4 hours | Total Time: 5 hours | Servings: 10-12 | Calories: 385 per slice
The Art of the Perfect Cake Roll
Creating a crack-free cake roll requires understanding the science behind the technique. The key is achieving the right balance of moisture and structure in the cake itself. Too dry, and it will crack when rolled; too moist, and it won’t hold its shape.
Separating the eggs and whipping the whites creates maximum lift and tenderness, while the careful folding technique preserves those air bubbles that make the cake light. The immediate rolling while warm is crucial—this is when the cake is most pliable and will accept the curved shape without breaking.
Cake flour, rather than all-purpose flour, contains less protein, resulting in a more tender crumb that rolls more easily. If you don’t have cake flour, substitute ¾ cup all-purpose flour minus 2 tablespoons, then add 2 tablespoons cornstarch and sift together twice.
Understanding Cheesecake Filling Dynamics
The filling in these rolls needs to be stable enough to hold its shape when sliced, yet light enough not to overwhelm the delicate cake. The combination of cream cheese for richness and whipped cream for lightness creates the perfect texture balance.
Gelatin serves as insurance, providing just enough structure to prevent the filling from being too soft while maintaining the creamy mouthfeel. The amount used is minimal—just enough to stabilize without creating a rubbery texture.
Room temperature cream cheese is absolutely critical for smooth mixing. Cold cream cheese will create lumps that no amount of beating can eliminate. Plan ahead and take it out of the refrigerator 2-3 hours before making the filling.
Strawberry Selection and Preparation
The success of these rolls depends heavily on your strawberry selection. Choose berries that are ripe but still firm—they should have deep red color throughout and give slightly to gentle pressure without being mushy.
Avoid berries that are overly large or have white shoulders, as these are often less flavorful and more watery. Medium-sized berries typically offer the best flavor concentration and texture for this application.
The maceration process with sugar isn’t just for sweetness—it draws out the natural juices and concentrates the strawberry flavor. The brief draining prevents excess moisture from thinning the cheesecake filling while the sugar enhances the berries’ natural sweetness.
Advanced Rolling Techniques
If you’re nervous about rolling, practice with the towel method first using just the cake. The muscle memory created by the initial hot roll makes the final assembly much easier.
Should small cracks appear during rolling, don’t panic. Position them on the bottom where they won’t be visible, and the filling will help hold everything together. The whipped cream topping can also camouflage minor imperfections.
For extra insurance against cracking, some bakers brush the cooled cake lightly with simple syrup before adding the filling. This adds moisture and flexibility without affecting the flavor.
Creative Flavor Variations
While strawberry shortcake is classic, this technique adapts beautifully to other flavor combinations. For chocolate lovers, add 3 tablespoons of cocoa powder to the cake flour and create a chocolate cheesecake filling by adding melted and cooled chocolate to the cream cheese mixture.
Lemon lovers can add lemon zest to both the cake and filling, with diced fresh berries or lemon curd swirled through the filling. The bright citrus creates a completely different but equally delicious experience.
For fall variations, add warm spices like cinnamon and nutmeg to the cake, with a spiced cream cheese filling and diced apples or pears. This creates an apple pie cheesecake roll that’s perfect for autumn gatherings.
Tropical versions work beautifully with coconut extract in the cake, cream cheese filling studded with diced mango and pineapple, and toasted coconut garnish.
Troubleshooting Common Challenges
Cracked Cake: Usually caused by overbaking, under-whipped whites, or rolling when too cool. The cake should be rolled while still warm for maximum flexibility.
Deflated Filling: This typically happens when the cream is overwhipped or the gelatin is too hot when added. Cream should only reach soft to medium peaks, and gelatin should be lukewarm, not hot.
Soggy Bottom: Often results from too much moisture in the strawberries or not draining them properly. Always pat fruit dry before folding into the filling.
Won’t Hold Shape: Usually indicates insufficient chilling time or too-soft filling. Make sure to chill for the full 4 hours minimum for proper setting.
Professional Presentation Tips
For bakery-quality presentation, use a ruler to mark your cuts before slicing—uniform pieces look more professional. A sharp serrated knife works best, and warming it slightly under hot water between cuts creates cleaner slices.
Consider making individual mini rolls using smaller pans and cutting the recipe proportionally. These make elegant individual desserts perfect for dinner parties or special occasions.
For special events, pipe additional whipped cream rosettes on each slice and garnish with chocolate shavings, mint leaves, or edible flowers for restaurant-quality presentation.
Storage and Make-Ahead Strategies
These rolls actually improve with overnight chilling—the flavors meld beautifully and the texture becomes perfectly set. They can be made up to 2 days ahead and stored tightly wrapped in the refrigerator.
For longer storage, the unfilled cake can be wrapped and frozen for up to 2 months. Thaw completely before filling and rolling—the texture will be virtually identical to fresh.
Don’t add the final whipped cream topping until serving day to maintain the best appearance and texture. The rolls can be sliced and plated, then topped just before serving.
Scaling for Special Occasions
This recipe doubles easily for large gatherings, though you’ll need multiple jelly roll pans and possibly need to bake in batches depending on your oven capacity.
For smaller groups, the recipe can be halved and baked in an 11×7-inch pan, though the rolling technique remains the same. Adjust baking time to 10-12 minutes for the smaller size.
Consider making multiple flavors for variety—strawberry, chocolate, and lemon rolls create a beautiful dessert buffet that appeals to different preferences.
Nutritional Benefits and Considerations
Despite being an indulgent dessert, these rolls provide some nutritional benefits from the fresh strawberries, including vitamin C, fiber, and antioxidants. The protein from eggs and dairy also adds some nutritional substance.
For lighter versions, you can substitute part of the heavy cream in the filling with Greek yogurt, though this will change the texture slightly. Sugar-free alternatives can work in the filling, but may affect the setting properties.
The individual slice format makes portion control easier than traditional whole cheesecakes, allowing people to enjoy a reasonable serving of this rich dessert.
Serving Occasions and Pairings
These elegant rolls are perfect for spring and summer entertaining when strawberries are at their peak. They’re sophisticated enough for dinner parties yet approachable enough for family gatherings.
The beautiful spiral presentation makes them ideal for special occasions—birthdays, anniversaries, or holiday celebrations where you want to create a memorable dessert experience.
Pair with coffee, tea, or even champagne for brunch gatherings. The sweet-tart balance works beautifully with both hot and cold beverages.
Final Thoughts
Sweet Strawberry Shortcake Cheesecake Rolls represent the best of creative baking—taking beloved classic flavors and combining them in an innovative format that enhances each component. The technique might seem complex at first glance, but breaking it down into manageable steps reveals that it’s entirely achievable for home bakers willing to take their time and follow proper technique.
The reward for mastering this recipe extends far beyond the immediate satisfaction of creating something beautiful and delicious. You’ll gain confidence in advanced baking techniques like cake rolling and filling preparation, skills that translate to countless other recipes. The combination of textures—from the tender cake to the creamy filling to the fresh fruit—creates a dessert experience that engages all the senses and creates lasting memories.
Whether you’re celebrating a special occasion, impressing dinner guests, or simply indulging in the therapeutic process of creating something extraordinary, these rolls deliver on every level. The stunning spiral presentation, combined with the perfect balance of flavors and textures, makes this the kind of dessert that becomes legendary in your recipe collection—the one people request for birthdays and special gatherings, and the one that establishes your reputation as a truly skilled baker.