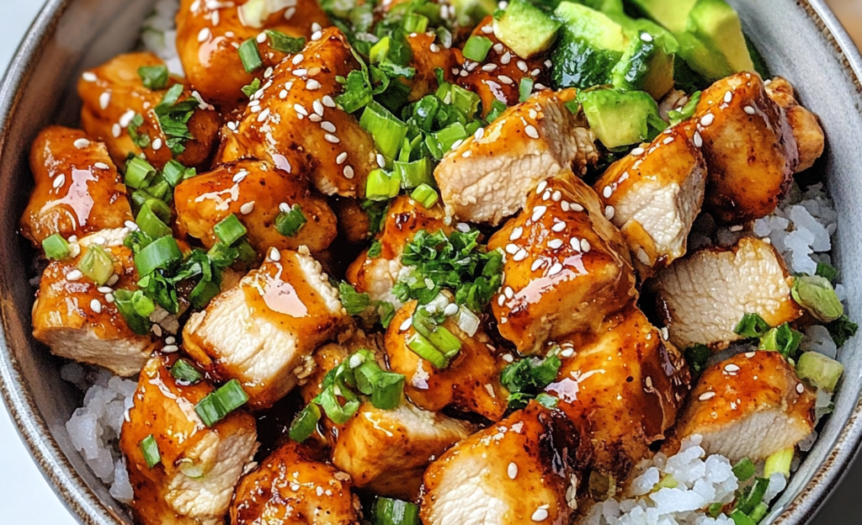
These hot honey chicken bowls are the perfect combination of sweet, spicy, and savory that’ll have you ditching your favorite takeout order forever. Tender, juicy chicken gets coated in a sticky, glossy hot honey glaze that’s got just the right amount of heat to make your taste buds dance, served over fluffy rice with fresh vegetables that add crunch and color to every bite. What I love most about these bowls is how they satisfy that craving for something indulgent and restaurant-quality while being surprisingly easy to make at home – the chicken stays incredibly moist, the sauce is addictively delicious, and you can customize the toppings to your heart’s content. I started making these on busy weeknights when I wanted something that felt special but came together quickly, and they’ve become such a family favorite that we now make them at least twice a month.
Why This Hot Honey Chicken Bowls Recipe Actually Works
The secret to incredible hot honey chicken lies in the double-coating technique that creates an extra crispy exterior that holds onto that gorgeous glaze, while keeping the chicken incredibly juicy and tender inside. The chicken gets seasoned, coated in flour, then dipped in buttermilk and coated again, creating layers that crisp up beautifully when pan-fried and provide the perfect surface for the hot honey sauce to cling to.
The hot honey glaze itself is pure magic – it starts with real honey that gets heated with butter, garlic, and just the right amount of hot sauce and red pepper flakes to create complex layers of flavor. The honey caramelizes slightly as it cooks, developing deeper flavors while the heat builds gradually rather than hitting you all at once. What makes this recipe foolproof is that everything comes together in one pan after the chicken is cooked, so the flavors meld together perfectly and you’re not juggling multiple components at once.
Key Benefits That Make This Worth Making
Restaurant-Quality at Home – These bowls taste like something you’d order at a trendy restaurant but cost a fraction of the price and let you control exactly what goes into them. The homemade hot honey sauce is so much better than anything you can buy, and you can adjust the heat level to your exact preferences.
Perfect for Meal Prep – The components can all be prepped ahead and assembled quickly during the week. The chicken stays delicious when reheated, the sauce keeps well in the refrigerator, and you can prep all your toppings in advance for quick assembly throughout the week.
Completely Customizable – This recipe is incredibly flexible – you can adjust the spice level, change up the vegetables, use different grains instead of rice, or add whatever toppings you love. It’s a great way to use up vegetables in your fridge and create bowls that suit everyone’s preferences.
Satisfying and Balanced – Unlike a lot of takeout that leaves you feeling heavy or unsatisfied, these bowls provide protein, vegetables, and carbs in perfect proportion. The fresh vegetables add nutrition and crunch that balances the richness of the glazed chicken beautifully.
Complete Ingredients Breakdown
For the Hot Honey Chicken:
1½ Pounds Boneless, Skinless Chicken Thighs Chicken thighs are the secret to incredibly juicy, flavorful chicken that stays tender even when coated and pan-fried. They have more fat and connective tissue than breasts, which means they’re almost impossible to overcook and have much better flavor. Look for thighs that are roughly the same size for even cooking. You can substitute chicken breasts if you prefer, but thighs are definitely superior for this recipe.
1 Cup All-Purpose Flour This creates the crispy coating that holds the hot honey glaze so beautifully. All-purpose flour gives the best texture – not too heavy like bread flour, not too light like cake flour. You’ll use this flour in two stages of coating, so make sure you have enough. Measure it properly by spooning into the cup and leveling off.
½ Cup Buttermilk Buttermilk tenderizes the chicken and helps the second coating stick perfectly. The acidity breaks down proteins slightly, making the chicken more tender, while the thickness helps create an even coating. If you don’t have buttermilk, you can substitute with ½ cup regular milk mixed with 1 tablespoon white vinegar – let it sit for 5 minutes to curdle.
2 Teaspoons Garlic Powder Garlic powder distributes more evenly in the coating than fresh garlic and won’t burn during frying. Make sure it’s fresh and aromatic – old garlic powder can taste bitter or dusty. This adds savory depth that complements the sweet honey beautifully.
2 Teaspoons Paprika Sweet paprika adds beautiful color and mild, sweet pepper flavor to the coating. It also helps the chicken develop that gorgeous golden-brown color when it cooks. Smoked paprika would add extra depth if you have it, but regular sweet paprika is perfect.
1 Teaspoon Onion Powder Like garlic powder, onion powder distributes evenly and adds savory depth without the risk of burning that fresh onions would have. It should smell strongly of onions when you open the container – if it’s old and weak, use a bit more.
1 Teaspoon Salt This seasons the chicken from the inside out and helps draw out moisture, which actually helps the coating stick better. Use fine salt like table salt or fine sea salt so it distributes evenly throughout the flour mixture.
½ Teaspoon Black Pepper Freshly ground black pepper is best, but pre-ground works fine too. This adds subtle heat and complexity that enhances all the other flavors without competing with the hot honey sauce.
¼ Teaspoon Cayenne Pepper This adds background heat to the coating itself, which builds on the heat from the hot honey sauce. Start with less if you’re sensitive to spice – you can always add more next time, but you can’t take it out once it’s mixed in.
For the Hot Honey Glaze:
⅓ Cup Honey Use good quality honey for the best flavor – it’s the star of this sauce. Clover honey is mild and sweet, while wildflower honey has more complex flavors. Avoid anything labeled “honey-flavored syrup” – you want pure honey. The honey should be liquid; if it’s crystallized, warm it gently to liquify before using.
3 Tablespoons Butter Butter adds richness and helps create the glossy, clingy texture that makes this glaze so irresistible. Use unsalted butter so you can control the salt level. The butter should be at room temperature for easy mixing, but it will melt when you heat the sauce anyway.
2 Tablespoons Hot Sauce (like Frank’s RedHot) Frank’s RedHot is perfect because it has good flavor without being too vinegary or too hot. You want a sauce that adds heat and tang without overpowering the honey. Sriracha works well too if you prefer a garlicky heat. Start with less if you’re not sure about the heat level.
2 Garlic Cloves (minced) Fresh garlic is essential here – it gets sautéed briefly in the glaze, which mellows its bite and adds aromatic depth. Mince it finely so it distributes evenly and doesn’t create chunks in your smooth glaze. Make sure it’s fresh and firm, not dried out or sprouting.
1 Tablespoon Apple Cider Vinegar This adds brightness and balances the sweetness of the honey. Apple cider vinegar has a milder, more complex flavor than white vinegar and complements the other flavors perfectly. Don’t skip this – the acid is crucial for balancing all that sweetness.
½ Teaspoon Red Pepper Flakes These add heat and visual interest to the glaze. Start with less if you’re sensitive to spice, or add more if you love heat. The flakes distribute throughout the sauce and give little bursts of heat as you eat.
¼ Teaspoon Salt Just enough salt to enhance all the other flavors and balance the sweetness. The salt makes the honey taste more honey-like and helps all the flavors pop.
For the Bowl Assembly:
3 Cups Cooked Jasmine Rice Jasmine rice has the perfect texture and subtle floral aroma that complements the hot honey chicken beautifully. Cook it according to package directions and let it rest for 5 minutes before fluffing. You can also use brown rice for more nutrition, basmati rice for extra fragrance, or even cauliflower rice for a low-carb option.
2 Cups Coleslaw Mix or Shredded Cabbage Pre-made coleslaw mix is convenient and adds great crunch and color. Look for a mix that includes both green and purple cabbage for the most visual appeal. If you prefer to make your own, shred green and purple cabbage thinly with a sharp knife or mandoline.
1 Large Cucumber (diced) English cucumbers work best because they have thin skins and fewer seeds. Cut into small, uniform dice for the best texture and appearance. The cucumber adds freshness and crunch that balances the richness of the glazed chicken perfectly.
1 Large Carrot (julienned or shredded) Fresh carrots add sweetness, crunch, and beautiful orange color. You can julienne them with a knife, use a vegetable peeler to create ribbons, or simply shred them with a box grater. They should be crisp and fresh, not limp or dried out.
2 Green Onions (sliced) Use both the white and green parts for the best flavor and visual appeal. Slice them thinly on the diagonal for the most attractive presentation. Green onions add a mild onion flavor and fresh color that brightens the entire bowl.
¼ Cup Fresh Cilantro (chopped) Fresh cilantro adds brightness and herbaceous flavor that cuts through the richness of the hot honey chicken. If you’re not a cilantro fan, you can substitute with fresh parsley or just omit it entirely. Make sure it’s fresh and bright green, not wilted or yellowing.
Sesame Seeds for garnish (optional) Toasted sesame seeds add a nutty flavor and attractive appearance. You can buy them pre-toasted or toast your own in a dry skillet for 2-3 minutes until golden and fragrant. Both black and white sesame seeds work beautifully.

Step-by-Step Instructions
1. Start by preparing your chicken – cut the thighs into bite-sized pieces, about 1-inch chunks. Pat them completely dry with paper towels, which helps the coating stick better and prevents oil splatter when cooking. Season the chicken pieces lightly with salt and pepper.
2. Set up your coating station with three shallow dishes: one with the flour mixed with all the dry seasonings (garlic powder, paprika, onion powder, salt, pepper, and cayenne), one with the buttermilk, and one with plain flour for the final coating. This double-coating method creates the crispiest exterior.
3. Working in batches, dredge the chicken pieces first in the seasoned flour, shaking off excess. Then dip into the buttermilk, allowing excess to drip off. Finally, coat again in the plain flour, pressing gently to help it adhere. Set the coated chicken on a wire rack while you finish the rest.
4. Heat about ¼ inch of vegetable oil in a large skillet over medium-high heat until it shimmers and a drop of water sizzles immediately. Don’t let the oil get so hot that it smokes – this will burn the coating before the chicken cooks through.
5. Fry the chicken in batches, being careful not to overcrowd the pan. Cook for 3-4 minutes per side until golden brown and crispy, and the internal temperature reaches 165°F. Transfer cooked chicken to a paper towel-lined plate and repeat with remaining pieces.
6. While the chicken rests, make the hot honey glaze by wiping out any excess oil from the skillet (but don’t clean it completely – those browned bits add flavor). Add the butter and minced garlic, cooking for 30 seconds until fragrant but not browned.
7. Add the honey, hot sauce, apple cider vinegar, red pepper flakes, and salt to the skillet. Whisk everything together and bring to a gentle simmer. Let it cook for 2-3 minutes until slightly thickened and glossy, whisking occasionally.
8. Return the cooked chicken to the skillet with the hot honey glaze and toss gently to coat every piece completely. The glaze should cling to the chicken beautifully and look glossy and appetizing. Remove from heat once everything is well coated.
9. Prepare your bowl components while the chicken finishes. Warm the cooked rice if needed and fluff it with a fork. Arrange the shredded cabbage, diced cucumber, julienned carrots, and any other vegetables you’re using in separate piles for easy serving.
10. To assemble the bowls, start with a base of warm rice in each bowl. Top with a generous portion of the hot honey chicken, then arrange the fresh vegetables around the bowl. Garnish with sliced green onions, fresh cilantro, and sesame seeds. Serve immediately while the chicken is still warm and crispy.
Pro Tips & Variations
Make-Ahead Strategy: You can prep all the components ahead of time – coat the chicken and refrigerate for up to 4 hours before cooking, make the hot honey sauce and store it in the fridge for up to a week, and prep all your vegetables the day before. When you’re ready to eat, just fry the chicken and warm the sauce.
Spice Level Customization: This recipe is moderately spicy as written, but you can easily adjust it. For milder heat, reduce the cayenne in the coating and use less hot sauce in the glaze. For more heat, add extra red pepper flakes or use a hotter sauce like sriracha or even habanero sauce.
Vegetable Variations: This recipe is incredibly flexible with vegetables. Try shredded purple cabbage, snap peas, bell peppers, avocado, or pickled vegetables. Roasted vegetables like broccoli or Brussels sprouts also work beautifully and add different textures and flavors.
Grain Alternatives: While jasmine rice is classic, you can use quinoa, brown rice, cauliflower rice, or even noodles as your base. Each gives a different texture and nutritional profile while still being delicious with the hot honey chicken.
Troubleshooting Common Issues
“My chicken coating isn’t crispy enough” – Make sure your oil is hot enough before adding the chicken (it should sizzle immediately), don’t overcrowd the pan, and ensure the chicken is completely dry before coating. Also, let the coated chicken rest for 5-10 minutes before frying to help the coating set.
“The hot honey glaze is too thin” – Let it simmer a bit longer to reduce and thicken, or add an extra tablespoon of honey. The glaze should coat a spoon lightly but still be pourable. If it gets too thick, whisk in a teaspoon of water to thin it out.
“It’s too spicy/not spicy enough” – The beauty of making it at home is you can adjust to taste. Start with less spice and add more gradually – you can always add heat but you can’t take it away. Have some plain rice or cucumber ready to cool things down if needed.
“The chicken is dry” – This usually happens with chicken breasts or if the chicken is overcooked. Chicken thighs are much more forgiving, but if using breasts, don’t cook them past 165°F internal temperature. Also, make sure to coat them in the hot honey glaze while they’re still hot for maximum flavor absorption.
“Everything falls apart when I try to coat the chicken” – Make sure your chicken pieces aren’t too small, and handle them gently during coating. Let the coated pieces rest on a wire rack for 10 minutes before frying to help the coating set and adhere better.