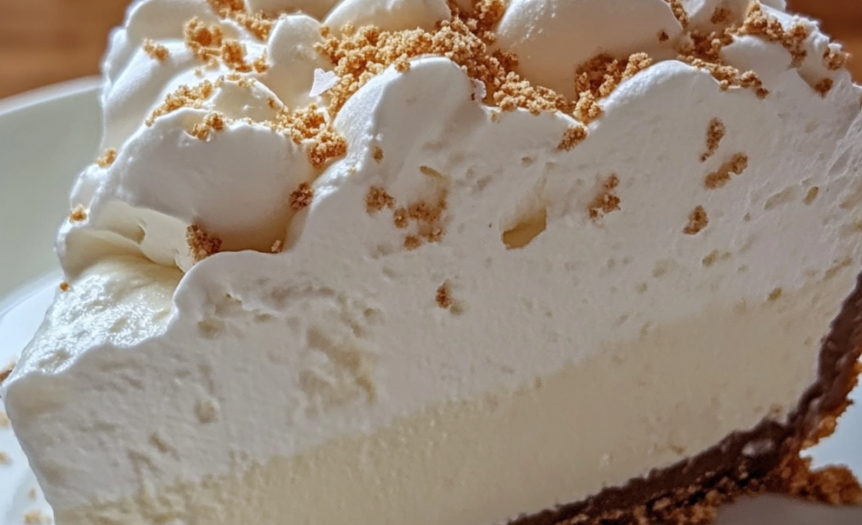
This marshmallow whip cheesecake delivers clouds of ethereal sweetness in every bite, combining the rich creaminess of traditional cheesecake with the light, airy texture of marshmallow fluff for a dessert that literally melts in your mouth. The combination of cream cheese and marshmallow creates an impossibly smooth filling that’s both indulgent and surprisingly light, making it perfect for those who love cheesecake but want something a little more whimsical. If you enjoy this style of dreamy, cloud-like dessert, you might also like strawberry fluff pie, cotton candy cheesecake, or other marshmallow-inspired treats.
Why You’ll Love This Recipe
- Uniquely light texture – achieves the perfect balance between rich cheesecake density and airy marshmallow fluffiness, creating a dessert experience unlike any other
- No-bake convenience – requires no oven time or water bath techniques, making it accessible for novice bakers while still delivering professional-quality results
- Kid and adult appeal – satisfies childhood marshmallow cravings while providing the sophisticated flavors that adults appreciate in quality desserts
- Customizable presentation – serves as an excellent canvas for various toppings, mix-ins, and flavor variations that can match any occasion or preference
Ingredients Breakdown
Cream cheese: The rich foundation that provides structure, tang, and luxury to balance the sweetness of the marshmallow components. Use full-fat cream cheese exclusively, as reduced-fat versions contain stabilizers and excess water that prevent the smooth, creamy texture essential to this dessert. The cream cheese must be completely softened to room temperature – this typically requires 2-3 hours outside the refrigerator. Properly softened cream cheese beats to a fluffy, lump-free consistency that creates the silky base for incorporating the marshmallow elements.
Marshmallow fluff: The signature ingredient that transforms ordinary cheesecake into something magical and unique. Marshmallow fluff provides sweetness, incredible lightness, and the characteristic flavor that defines this dessert. Unlike regular marshmallows, fluff has the smooth consistency needed to blend seamlessly with cream cheese without lumps or grittiness. Jet-Puffed is the most widely available brand and produces consistent results. The fluff should be at room temperature for easiest mixing and smoothest incorporation.
Heavy whipping cream: Creates the airy, mousse-like texture that makes this cheesecake so special and light. The cream must be cold and whipped to medium-stiff peaks before folding into the cream cheese mixture. This whipped cream lightens the dense cheesecake base while adding richness and stability. Don’t over-whip the cream, which can cause it to become grainy or even turn to butter. The goal is smooth, billowy peaks that fold easily into the other ingredients without deflating.
Vanilla wafer crust: Provides a sweet, cookie-like foundation that complements the marshmallow flavors perfectly. Vanilla wafers offer more delicate flavor than graham crackers, allowing the marshmallow to shine while providing necessary textural contrast. You can use store-bought vanilla wafer crusts for convenience, or make your own by crushing vanilla wafers with butter for superior flavor and texture. The crust should be pressed firmly to create a stable base that won’t crumble when sliced.
Powdered sugar: Sweetens and stabilizes the filling while dissolving completely for smooth texture. Powdered sugar incorporates more easily than granulated sugar in no-bake applications, preventing grittiness that could detract from the smooth, creamy finish. Sift the powdered sugar if it seems lumpy to ensure the smoothest possible texture. The amount can be adjusted based on sweetness preference and the natural sweetness of your marshmallow fluff.
Step-by-Step Instructions
- Remove 24 ounces (three 8-ounce packages) of cream cheese from the refrigerator 2-3 hours before beginning to ensure complete softening. Room temperature cream cheese is crucial for achieving the smooth, lump-free texture that defines quality cheesecake. The cream cheese should feel soft and pliable when pressed, with no cold, firm center remaining.
- Prepare your 9-inch springform pan by ensuring you have a vanilla wafer crust ready. If making your own crust, crush 30 vanilla wafers into fine crumbs, mix with 5 tablespoons melted butter, and press firmly into the bottom and slightly up the sides of the pan. Refrigerate the crust while preparing the filling to help it set firmly.
- In a large mixing bowl, beat the softened cream cheese with an electric mixer on medium speed until completely smooth and fluffy, about 3-4 minutes. Scrape down the sides of the bowl frequently to ensure even mixing. The cream cheese should be noticeably lighter in color and texture, with no lumps visible when properly beaten.
- Add 1 1/2 cups of marshmallow fluff to the cream cheese and beat on medium speed until fully incorporated and smooth. The mixture should be uniform in color and texture, with the marshmallow fluff completely integrated rather than streaky. This may take 2-3 minutes of beating with frequent scraping of the bowl sides.
- Gradually add 1 cup of powdered sugar, 2 teaspoons of vanilla extract, and 1/4 teaspoon of salt, beating until smooth after each addition. The salt enhances the overall flavor and prevents the dessert from being one-dimensionally sweet. Taste the mixture and adjust sweetness or vanilla as desired, keeping in mind that chilling will mellow the flavors slightly.
- In a separate bowl, whip 1 1/2 cups of cold heavy cream with an electric mixer until medium-stiff peaks form. The cream should hold its shape when the beaters are lifted but not be so stiff that it’s grainy or buttery. This typically takes 2-3 minutes of whipping, but watch carefully as cream can over-whip quickly.
- Using a large rubber spatula, gently fold one-third of the whipped cream into the cream cheese mixture to lighten it. Use a folding motion rather than stirring to preserve the air bubbles that create the light texture. Once incorporated, fold in the remaining whipped cream in two additions, being gentle to maintain the airy consistency.
- Pour the filling into the prepared crust, spreading evenly with an offset spatula. The surface should be smooth and level, with no air pockets visible. Gently tap the pan on the counter a few times to settle the filling and release any trapped air bubbles that could create holes in the finished cheesecake.
- Cover the cheesecake with plastic wrap, being careful not to let the plastic touch the surface of the filling. Refrigerate for at least 4 hours, though overnight chilling produces the best texture and allows flavors to meld completely. The cheesecake should be completely set and firm to the touch when properly chilled.
- Before serving, prepare any desired toppings such as additional whipped cream, toasted marshmallows, or fruit. Run a thin knife around the edges of the pan to loosen the cheesecake before removing the springform sides. The cheesecake should hold its shape perfectly while maintaining the light, creamy texture that makes it special.
Perfect Texture: What to Look For
The ideal marshmallow whip cheesecake should have an incredibly smooth, mousse-like texture that’s simultaneously rich and airy. When properly made, it should feel light on the tongue while still providing the satisfaction of cream cheese richness. The filling should be completely set but not firm like traditional baked cheesecake – it should have a soft, almost cloud-like consistency that melts beautifully in your mouth. The color should be uniform throughout, with no streaks of unmixed marshmallow or cream. When sliced, the cheesecake should cut cleanly with minimal sticking to the knife, and each slice should hold its shape while remaining tender and creamy.
Customization Options
This versatile base recipe welcomes numerous delicious variations that enhance the marshmallow theme. For s’mores inspiration, add crushed graham crackers to the crust and fold mini chocolate chips into the filling, then top with toasted marshmallows. Create a strawberry version by swirling strawberry puree through the filling or using strawberry marshmallow fluff if available. For chocolate lovers, substitute chocolate wafer cookies for the vanilla crust and add 2 tablespoons of cocoa powder to the filling. Fresh fruit like berries or sliced peaches provides beautiful color contrast and balances the sweetness perfectly.
Practical Tips
Temperature management: All ingredients except the heavy cream should be at room temperature for optimal mixing and texture. Cold cream cheese won’t achieve the smooth consistency needed, while warm ingredients can cause the whipped cream to deflate when folded together.
Whipped cream technique: Use a chilled bowl and beaters for the best whipped cream results. Watch carefully as you approach medium peaks – over-whipped cream cannot be rescued and will create a grainy texture in the finished cheesecake. If you’re nervous about over-whipping, stop just before you think it’s ready and check the peaks.
Folding method: The gentle folding technique preserves the air bubbles that create the light texture. Cut down through the center of the mixture, across the bottom, and up the sides, rotating the bowl as you work. This motion incorporates ingredients without deflating the whipped cream.
Storage: This cheesecake keeps beautifully refrigerated for up to 4 days when properly covered. The texture actually improves after the first day as flavors meld. Avoid freezing, as the texture changes significantly when thawed and doesn’t maintain the characteristic light, creamy consistency.
Common Questions
Can I use mini marshmallows instead of marshmallow fluff? Marshmallow fluff is essential for the smooth texture – mini marshmallows won’t melt and incorporate properly in a no-bake application. If you can’t find marshmallow fluff, you can make your own by melting mini marshmallows with a small amount of corn syrup and cooling to room temperature before using.
Why is my filling grainy or lumpy? This usually results from insufficiently softened cream cheese or over-whipped cream. Ensure cream cheese is completely soft before beginning, and whip cream only to medium-stiff peaks. If the mixture becomes grainy, try gently warming the bowl slightly and re-beating briefly.
Can I make this ahead for a party? Yes, this cheesecake actually benefits from advance preparation. Make it 1-2 days ahead and keep refrigerated. Add any garnishes just before serving to maintain their texture and appearance. The flavors improve as they meld together during chilling.
How do I prevent the filling from being too sweet? The salt in the recipe helps balance sweetness, but you can reduce the powdered sugar slightly if preferred. Adding a tablespoon of lemon juice can also help cut the sweetness while enhancing other flavors. Remember that the vanilla wafer crust adds sweetness too, so consider this in your adjustments.
Serving Suggestions
This ethereal dessert is best served in modest portions due to its rich, sweet nature. Pair with fresh berries that provide color contrast and acidic balance to cut through the sweetness. A small drizzle of chocolate or caramel sauce creates beautiful presentation while adding complementary flavors. For special occasions, top individual slices with lightly toasted mini marshmallows for extra visual impact and textural interest.
The cheesecake works beautifully for birthday parties, especially for children who love marshmallow flavors, but sophisticated enough for adult gatherings when presented elegantly. Serve on chilled plates with a light dusting of cocoa powder or cinnamon for color contrast. Pair with coffee, hot chocolate, or dessert wines that complement the sweet, creamy flavors without competing with the delicate marshmallow notes.
Nutritional Benefits
While definitely an indulgent treat, this cheesecake does provide some nutritional value from its dairy components. The cream cheese contributes protein and calcium, while the heavy cream provides vitamin A and additional calcium. The no-bake preparation preserves more of the natural nutrients compared to baked versions that may lose some vitamins during high-heat cooking.
To enjoy this dessert as part of a balanced approach, serve appropriate portion sizes and balance with lighter meals throughout the day. The rich, satisfying nature means a small slice provides significant satisfaction, potentially preventing overindulgence in other sweets. The homemade preparation allows you to control ingredient quality and avoid the artificial preservatives found in many commercial desserts, creating a more wholesome indulgence for special occasions when you want something truly special and memorable.