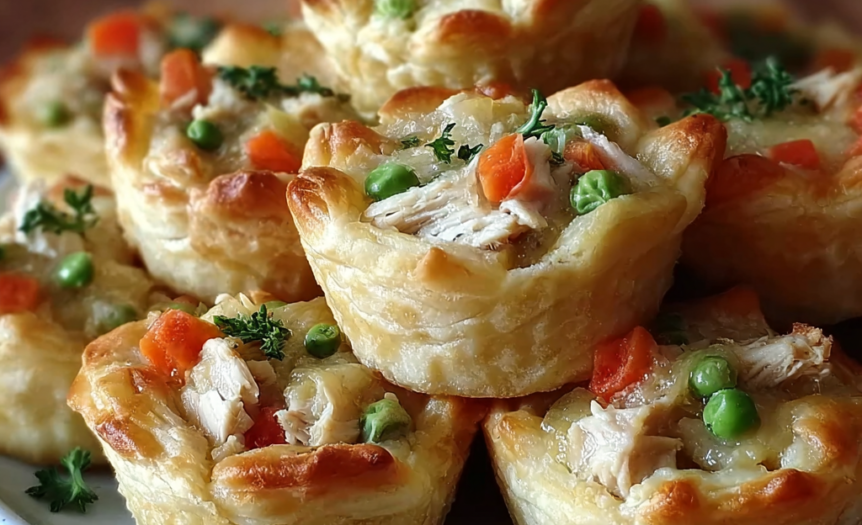
There’s something absolutely irresistible about comfort food that’s been reimagined into perfect individual portions, and these mini chicken pot pie muffins capture all the cozy satisfaction of traditional pot pie while making it infinitely more practical and fun to serve. Each muffin-sized portion delivers tender chicken, vegetables, and creamy sauce wrapped in flaky pastry that bakes to golden perfection—like having your own personal pot pie that fits perfectly in your hand.
I developed this recipe during a particularly busy period when I was trying to create freezer-friendly meals that my family could grab and reheat throughout the week. The challenge was maintaining all those beloved pot pie flavors while creating something that would bake evenly in muffin tins and hold together beautifully when eaten. After several attempts, I discovered that the key lies in the right balance of filling consistency and pastry technique that creates individual pies with all the comfort of the original.
What makes these mini pot pie muffins truly special is how they concentrate all the best elements of traditional pot pie into perfectly portioned packages. Each muffin delivers the complete pot pie experience—flaky, buttery crust giving way to creamy, herb-seasoned filling packed with tender chicken and vegetables. They’re substantial enough to be satisfying while being convenient enough for lunch boxes, picnics, or casual entertaining.
This recipe yields 24 mini muffins using a standard muffin tin, making it perfect for meal prep, parties, or feeding families with varying schedules. They freeze beautifully and reheat perfectly, making them ideal for busy households that want homemade comfort food without the daily time commitment.
Ingredients
For the Pastry:
- 2 packages (14.1 oz each) refrigerated pie crusts, thawed
- 1 large egg, beaten (for egg wash)
- 1 tablespoon whole milk
For the Chicken Filling:
- 3 cups cooked chicken, diced small (rotisserie works perfectly)
- 2 tablespoons unsalted butter
- 1 medium yellow onion, finely diced
- 2 medium carrots, diced small
- 2 celery stalks, diced small
- 3 garlic cloves, minced
- ¼ cup all-purpose flour
- 2 cups low-sodium chicken broth
- ½ cup heavy cream
- 1 cup frozen peas
- 2 tablespoons fresh thyme leaves (or 2 teaspoons dried)
- 1 tablespoon fresh sage, chopped (or 1 teaspoon dried)
- 1 teaspoon salt
- ½ teaspoon black pepper
- ¼ teaspoon garlic powder
Optional Add-ins:
- ½ cup corn kernels
- ¼ cup fresh parsley, chopped
- ½ teaspoon paprika
Instructions
Preheat your oven to 375°F and generously grease two 12-cup muffin tins with butter or cooking spray. This temperature provides the perfect balance for cooking the filling through while achieving golden, flaky pastry. The greasing is crucial for easy removal once baked.
Begin by preparing the filling, which needs to be thick enough to hold together in the individual muffins without being dry. In a large skillet over medium heat, melt the butter until foaming. Add the diced onion, carrots, and celery, cooking for 5-7 minutes until the vegetables are softened but still have a slight bite. They’ll continue cooking in the oven, so don’t make them too soft at this stage.
Add the minced garlic and cook for another minute until fragrant. Sprinkle the flour over the vegetables and stir constantly for 1-2 minutes to cook out the raw flour taste and create a roux that will thicken your sauce.
Gradually pour in the chicken broth while stirring constantly to prevent lumps from forming. The mixture will look thin initially, but keep stirring and it will begin to thicken. Add the heavy cream and continue cooking for 3-4 minutes until the sauce coats the back of a spoon and has a consistency similar to thick gravy.
Remove the skillet from heat and stir in the diced chicken, frozen peas, thyme, sage, salt, pepper, and garlic powder. The frozen peas will thaw from the heat of the mixture and don’t need additional cooking. Taste and adjust seasonings as needed—the filling should be well-seasoned since it’s the heart of each muffin.
Let the filling cool for 10-15 minutes while you prepare the pastry. This cooling step is important because hot filling can make the pastry soggy and difficult to work with.
Unroll the pie crusts and use a 4-inch round cutter or large glass to cut circles for the bottom crusts. You should get about 12 circles from each crust. Gently press these circles into the muffin cups, allowing slight overhang that will help seal the tops later.
Using a 3-inch cutter or smaller glass, cut circles for the top crusts from any remaining pastry or by re-rolling scraps. These smaller circles will fit perfectly on top of the filled muffins.
Spoon about 2-3 tablespoons of the cooled filling into each pastry-lined muffin cup, filling them about ¾ full. Don’t overfill, as this can cause the muffins to burst during baking or make sealing difficult.
Place the smaller pastry circles on top of the filled muffins, then gently press the edges together to seal. You can crimp with a fork or simply pinch with your fingers for a rustic look. Cut a small slit in the top of each muffin to allow steam to escape during baking.
In a small bowl, whisk together the beaten egg and milk to create an egg wash. Brush this mixture over the tops of all the muffins—this creates that beautiful golden-brown color and glossy finish that makes them look professionally made.
Bake for 25-30 minutes, or until the pastry is golden brown all over and the filling is bubbling around the edges. The tops should be crispy and the bottoms should be cooked through, not soggy.
Let the muffins cool in the pans for 5-10 minutes before carefully removing them. This cooling period allows the filling to set slightly and prevents the muffins from falling apart when removed from the tin.

Flavor and Texture Notes
These mini chicken pot pie muffins deliver all the comfort and satisfaction of traditional pot pie in perfectly portioned packages. The pastry achieves that ideal balance of flaky and tender, with a golden-brown exterior that gives way to buttery layers inside. The bottom crust stays surprisingly crisp despite the moist filling, thanks to the proper consistency of the sauce and adequate baking time.
The filling captures the essence of classic pot pie with its creamy, herb-infused sauce that binds together tender chicken and perfectly cooked vegetables. The chicken remains moist and flavorful, while the vegetables provide color, nutrition, and textural variety. The combination of thyme and sage creates that traditional pot pie flavor profile that’s both comforting and sophisticated.
Each bite delivers the complete pot pie experience—you get crust, creamy sauce, protein, and vegetables all in perfect proportion. The individual size makes them incredibly satisfying while preventing the messy serving issues that sometimes come with traditional large pot pies.
The texture is particularly appealing—the contrast between the crispy, buttery pastry and the smooth, creamy filling creates the kind of satisfying mouthfeel that makes comfort food so irresistible.
Tips and Variations
For the most convenient approach, use rotisserie chicken from the grocery store. It’s already seasoned and perfectly moist, saving significant time while adding extra flavor to your filling. Just remove the skin and dice the meat into small, uniform pieces.
The key to preventing soggy bottoms is ensuring your filling is the right consistency—thick enough to hold together but not so thick that it’s pasty. If your filling seems too thin after cooling, return it to the heat and cook a bit longer to reduce excess moisture.
Don’t skip the cooling period for the filling. Hot filling will make the pastry dough difficult to work with and can cause the bottom crusts to become soggy before they have a chance to set in the oven.
Create variations by adding different vegetables like corn, mushrooms, or bell peppers. You can also experiment with different herbs—rosemary or oregano work beautifully in place of the thyme and sage.
For a richer flavor, substitute some of the chicken broth with white wine, or add a tablespoon of Dijon mustard to the filling for extra depth and complexity.
Storage and Make-Ahead Tips
These mini pot pie muffins are excellent for meal prep and actually improve slightly after sitting overnight as the flavors meld together. Store them in the refrigerator for up to 4 days in airtight containers, separating layers with parchment paper if stacking.
For freezing, let the baked muffins cool completely, then wrap individually in plastic wrap and store in freezer bags for up to 3 months. They can be reheated directly from frozen in a 350°F oven for 20-25 minutes until heated through.
You can also assemble the muffins completely and freeze them unbaked. Freeze on baking sheets until solid, then transfer to freezer bags. Bake directly from frozen, adding 10-15 minutes to the cooking time.
The filling can be made up to 2 days ahead and stored in the refrigerator, making assembly day much quicker. Just make sure it’s completely cool before using.
For busy mornings, reheat refrigerated muffins in the microwave for 45-60 seconds, or in a 350°F oven for 8-10 minutes until warmed through.
Serving Suggestions
These versatile muffins work beautifully for various meal occasions. For breakfast or brunch, serve them alongside fresh fruit or a simple green salad. Their portable nature makes them perfect for lunch boxes, picnics, or any meal on the go.
For dinner, pair them with roasted vegetables, mashed potatoes, or a hearty soup to create a complete comfort food meal. They’re substantial enough to serve as a main course for lighter appetites or as a satisfying side dish for heartier eaters.
These muffins are perfect for entertaining because they’re already portioned and can be served warm or at room temperature. They work wonderfully for potluck dinners, game day gatherings, or casual parties where finger foods are preferred.
For special occasions, consider making a variety by preparing different fillings—perhaps turkey and cranberry for Thanksgiving themes, or beef and mushroom for a different flavor profile.
FAQ
Can I use homemade pie crust instead of store-bought? Absolutely! Homemade pie crust will work beautifully and may even provide better flavor. Just make sure it’s well-chilled before cutting and shaping to prevent shrinkage during baking.
What if my filling is too thick or too thin? If too thick, add a bit more broth or cream while reheating. If too thin, return to heat and cook longer to reduce moisture, or mix a tablespoon of cornstarch with cold broth and stir into the filling until thickened.
Can I make these vegetarian? Yes! Substitute the chicken with diced mushrooms, extra vegetables, or even plant-based protein. Use vegetable broth instead of chicken broth and add extra herbs and seasonings for robust flavor.
Why are my muffin bottoms soggy? This usually happens when the filling is too wet or hasn’t cooled enough before assembly. Make sure your filling is thick and completely cool, and ensure your oven is fully preheated before baking.
Can I make mini versions using mini muffin tins? Definitely! Use mini muffin tins and reduce the filling to about 1 tablespoon per cup. Reduce baking time to 15-20 minutes, watching carefully to prevent over-browning.
These mini chicken pot pie muffins prove that comfort food can be both convenient and completely satisfying. They take everything wonderful about traditional pot pie and make it more practical for modern life while losing none of the warmth and satisfaction that makes this dish so beloved. Whether you’re meal prepping for busy weeks, feeding a crowd, or simply want to enjoy the perfect individual portion of comfort food, these little gems deliver big satisfaction in every single bite. The combination of flaky pastry, creamy filling, and tender chicken creates exactly the kind of food that makes ordinary meals feel special and brings families together around the table.