This Texas trash dip combines layers of seasoned ground beef, creamy cheese, and zesty seasonings to create an irresistibly indulgent appetizer that disappears at every gathering. The “trash” name comes from its humble, everything-but-the-kitchen-sink approach that transforms simple ingredients into a crowd-pleasing masterpiece that’s both satisfying and addictive. If you enjoy this style of hearty, shareable appetizer, you might also like loaded queso dip, seven-layer dip, or buffalo chicken dip.
Why You’ll Love This Recipe
- Ultimate crowd-pleaser – feeds a large group generously while appealing to diverse tastes, making it perfect for parties, potlucks, and game day gatherings
- Make-ahead convenience – can be assembled hours in advance and baked when guests arrive, eliminating last-minute preparation stress while ensuring hot, fresh results
- Hearty and satisfying – provides substantial protein and rich flavors that make it more filling than typical chip dips, essentially serving as a complete appetizer meal
- Customizable heat level – easily adjustable from mild to fiery depending on your crowd’s preferences without compromising the essential flavor profile
Ingredients Breakdown
Ground beef: The protein foundation that makes this dip substantial enough to satisfy hungry crowds. Choose 80/20 ground beef for the best balance of flavor and texture – the fat content keeps the meat moist and flavorful while preventing it from becoming dry or crumbly. The beef should be browned thoroughly to develop rich, savory flavors through the Maillard reaction, creating the meaty base that distinguishes this from cheese-only dips. For best results, break the meat into small, uniform pieces during cooking so it distributes evenly throughout the dip and provides consistent bites.
Cream cheese: Provides the rich, creamy foundation that binds all ingredients together while adding tangy richness that balances the savory beef. Full-fat cream cheese is essential for proper texture and flavor – reduced-fat versions can become grainy when heated and don’t provide the luxurious mouthfeel that makes this dip irresistible. The cream cheese must be completely softened to room temperature for smooth incorporation without lumps. This ingredient transforms what could be a simple meat and cheese mixture into a cohesive, creamy dip that coats chips perfectly.
Processed cheese: Velveeta or similar processed cheese products provide superior melting properties and smooth texture that natural cheeses can’t match in this application. While cheese purists might object, processed cheese prevents the graininess and separation that can occur with natural cheeses when heated for extended periods. The mild flavor allows the seasoned beef to shine while providing the characteristic stretchy, gooey texture that makes this dip so appealing. The cheese should be cubed for easier melting and even distribution.
Diced tomatoes with green chiles: Adds moisture, acidity, and mild heat that brightens the rich, heavy ingredients while providing textural interest. Rotel is the classic choice, offering the perfect balance of tomato flavor and green chile heat. Drain the tomatoes partially – you want some liquid for moisture but not so much that the dip becomes watery. The acidity from the tomatoes helps cut through the richness while the chiles add complexity and gentle heat that builds gradually rather than overwhelming.
Taco seasoning: Provides the distinctive Tex-Mex flavor profile that gives this dip its character and ties all ingredients together. Store-bought packets offer convenience and consistent results, though homemade blends allow customization of salt and spice levels. The seasoning should be bloomed briefly in the cooked beef to activate the spices and ensure even distribution throughout the meat. This is what transforms ordinary ground beef into the flavorful foundation that makes this dip special rather than generic.
Step-by-Step Instructions
- Preheat your oven to 350°F (175°C) and lightly grease a 9×13-inch baking dish or similar sized casserole dish. The size matters for proper cooking and serving – too small and the dip will be too thick, too large and it may dry out. A glass or ceramic dish works best for even heating and attractive presentation if serving directly from the baking dish.
- In a large skillet over medium-high heat, brown 1 pound of ground beef, breaking it into small, uniform pieces with a wooden spoon or spatula. Cook until no pink remains and the meat develops good browning, about 6-8 minutes. Don’t rush this step – proper browning creates the rich, savory flavors that form the foundation of the dip. Drain excess fat, leaving just enough to keep the meat moist.
- Add 1 packet (1 ounce) of taco seasoning to the cooked beef along with 2-3 tablespoons of water as directed on the packet. Stir to coat the meat evenly and cook for 1-2 minutes until the seasonings are fragrant and well-distributed. This blooming step activates the spices and ensures the seasoning penetrates the meat rather than just coating the surface.
- In a large mixing bowl, combine 8 ounces of softened cream cheese with one 10-ounce can of diced tomatoes with green chiles (drained partially), mixing until relatively smooth. The cream cheese should be soft enough to mash easily with a fork. If it’s too firm, microwave briefly to soften, but don’t let it melt completely. Some texture from the tomatoes is desirable, so don’t worry about achieving perfect smoothness.
- Add the seasoned ground beef to the cream cheese mixture and stir to combine thoroughly. The mixture should be well-integrated with the beef evenly distributed throughout the creamy base. Taste and adjust seasoning if needed – you can add additional taco seasoning, salt, or pepper to suit your preference.
- Fold in 8 ounces of cubed processed cheese (such as Velveeta), distributing the pieces evenly throughout the mixture. The cheese cubes should be small enough to melt evenly during baking but large enough to provide pockets of stretchy cheese in the finished dip. Don’t worry if the mixture seems chunky at this stage – it will smooth out during baking.
- Transfer the mixture to the prepared baking dish, spreading it evenly with a spatula to ensure uniform thickness and cooking. The surface should be relatively level for even browning and heating. If desired, sprinkle additional shredded cheese on top for extra richness and appealing golden color.
- Bake for 20-25 minutes until the dip is hot throughout and bubbling around the edges. The top should be lightly golden but not browned. If you’ve added cheese on top, it should be melted and slightly golden. The dip is ready when it’s uniformly hot and the cheese is completely melted and integrated.
- Remove from the oven and let cool for 5-10 minutes before serving. This brief cooling period allows the dip to set slightly and prevents burns from extremely hot cheese. The dip will remain warm for quite a while due to its density and the retained heat in the baking dish.
- Serve immediately with sturdy tortilla chips, corn chips, or even toasted bread for dipping. Provide serving spoons or small ladles to help guests portion the thick dip onto their chips. The dip can be kept warm in a slow cooker on low heat for extended serving periods during parties.

Perfect Texture: What to Look For
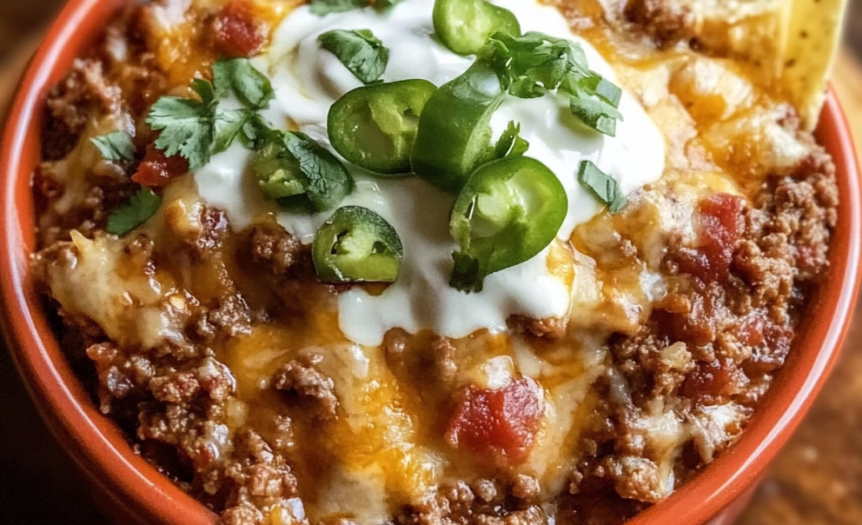
The ideal Texas trash dip should have a rich, creamy consistency that’s thick enough to cling generously to chips without being so thick that it’s difficult to scoop. The ground beef should be evenly distributed throughout in small pieces that provide meaty bites without overwhelming chunks. The cheese should be completely melted and integrated, creating a smooth, cohesive mixture without any grainy or separated areas. When hot, the dip should be easily spoonable but thick enough that it doesn’t run off chips immediately. The surface should show some bubbling during baking and have a slightly golden color if topped with additional cheese, indicating proper heating throughout.
Customization Options
This adaptable recipe welcomes numerous variations to suit different tastes and dietary preferences. For extra heat, add diced jalapeños, a dash of hot sauce, or use spicy taco seasoning and hot diced tomatoes with chiles. Create a more complex flavor by browning diced onions with the ground beef or adding a packet of ranch dressing mix along with the taco seasoning. For additional richness, incorporate sour cream or substitute half the cream cheese with Mexican crema. Vegetarians can replace the ground beef with seasoned black beans or plant-based meat alternatives. For extra indulgence, layer in cooked bacon pieces or chorizo along with the ground beef.
Practical Tips
Make-ahead strategy: This dip can be completely assembled up to 24 hours in advance and refrigerated before baking. When ready to serve, bring to room temperature for 30 minutes, then bake as directed, adding 5-10 minutes to account for the cold start. This advance preparation actually improves the flavor as ingredients have time to meld together.
Cheese melting success: Cut processed cheese into uniform cubes for even melting, and ensure all other ingredients are at room temperature before combining. If the dip seems too thick during baking, stir in a small amount of milk or broth. If it’s too thin, continue baking uncovered to allow excess moisture to evaporate.
Serving temperature: Keep the dip warm during parties by transferring to a slow cooker on low heat after baking. Stir occasionally and add a splash of milk if it becomes too thick. For smaller gatherings, the baking dish retains heat well for 30-45 minutes when covered with foil.
Storage: Leftover dip keeps refrigerated for 3-4 days and reheats well in the microwave or oven. Add a splash of milk when reheating to restore the creamy consistency, as the dip will thicken when cold. The flavors often improve after a day as they continue to meld together.
Common Questions
Can I use ground turkey or chicken instead of beef? Yes, though the flavor will be milder and you may want to increase the seasoning slightly. Choose ground turkey or chicken with some fat content (85/15 rather than 99% lean) to prevent the meat from becoming dry. Brown it thoroughly and season generously to compensate for the naturally milder flavor.
Why did my dip turn out grainy or separated? This usually happens when the cheese gets too hot too quickly or when using natural cheeses instead of processed cheese. Ensure all ingredients are at room temperature before combining, bake at the correct temperature, and use processed cheese for the smoothest results. If separation occurs, stir vigorously and add a splash of milk to help re-emulsify.
How do I make this spicier without overpowering the other flavors? Add heat gradually through jalapeños, hot sauce, or spicy versions of your base ingredients (hot taco seasoning, spicy diced tomatoes). Taste as you go, since heat builds and you can always add more but can’t remove it. A dash of cumin or smoked paprika can add depth along with the heat.
Can I make this in a slow cooker instead of baking? Absolutely – brown the meat and seasonings first, then combine all ingredients in a slow cooker and cook on low for 2-3 hours, stirring occasionally. This method works well for parties where you want to keep the dip warm for extended periods.
Serving Suggestions
This hearty dip works beautifully as the centerpiece appetizer for casual gatherings, game day parties, or potluck events. Serve with an assortment of sturdy dippers – thick tortilla chips, corn chips, and even toasted baguette slices or pita chips for variety. Consider setting up a “dip bar” with different chip options and additional toppings like chopped green onions, cilantro, or jalapeño slices that guests can add to customize their portions.
For more substantial service, this dip can function almost like a meal when served with warm flour tortillas, allowing guests to make informal tacos or quesadillas. Accompany with fresh salsa, guacamole, and sour cream for a complete Tex-Mex spread. The rich, filling nature of this dip means a little goes a long way, making it economical for feeding large crowds while providing serious satisfaction that keeps guests happy throughout long events.
Nutritional Benefits
While definitely an indulgent appetizer, this dip does provide substantial protein from the ground beef and dairy components, making it more nutritionally substantial than many party foods. The beef contributes complete protein, iron, and B vitamins, while the dairy products provide calcium and additional protein. The tomatoes add vitamin C and lycopene, beneficial antioxidants that are enhanced by the cooking process.
For a slightly healthier version, consider using lean ground beef and reduced-fat cream cheese, though this will affect the texture somewhat. Adding diced bell peppers or onions increases the vegetable content while maintaining the essential character of the dish. The key is enjoying this rich treat in appropriate portions as part of a balanced eating pattern, recognizing it as an occasional indulgence that brings people together around the table for shared enjoyment and celebration.

